
The Red Rull Ring in Spielberg Austria returned to the calendar in 2014, and has been a very popular real life and gaming track ever since. It always features in online racing leagues, as it’s such a good track for racing. And it’s also very easy to learn for newbies to F1 gaming (though tricky to completely master).
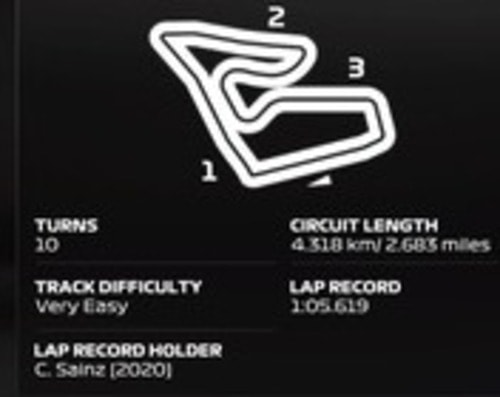
Because basically half the lap is three full throttle straights, which are also all DRS zones, straight line speed is a must on this track for racing, and most setups here are running low-medium downforce levels.
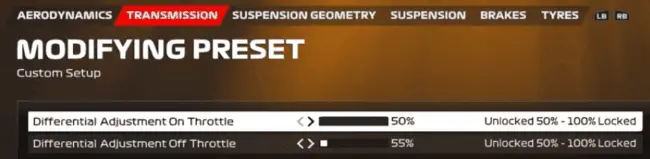
Here is an F1 23 race setup for Austria for a controller user:
- Wings – 19/21
- Diff – 50/55
- Camber – -2.50/-1.00/0.02/0.16
- Suspension – 36-10-10-1-33-39
- Brakes – 100 Pressure/54 Bias
- Tyre pressures –Fronts 22.6/Rears 20.1
This setup is partially taken from the excellent SimRacingSetups channel, but with significant mods for a controller, since wheel setups don’t translate over and need tweaking.
Additional Setup Considerations
Here are some additional points on creating a car setup for Austria:
Wing Levels – There’s a lot of variance in this between the different Austria setups I’ve seen – people are using anything from 15 to 22 with their wing levels. In general though, the lower you can go with wings on this track, the better, because half of it is 3 long DRS zones. Run wings too high and you’ll be a sitting duck on the straights.
Lower wings OP on this game – demonstrated
Wing Spacing – This is another thing where there’s variance. Aggressive setups and wheel users can run the rear wing lower than the front, but I find this doesn’t work on a pad and I need to invert this and put the rear wing 2 clicks higher for better stability and traction. The steering is very responsive on a controller so you need to space the wings apart in a way that avoids the car over-rotating and making traction difficult, especially on worn tyres. Experiment between 15 to 25, but my sweet spot was 19/21 wings.
Intermediate Conditions – For light rain conditions, you dry setup will work fine, or you can add 1-2 clicks of wing if desired. However, on a pad I’d definitely recommend spacing the rear wing 3 clicks above the front for better stability in the wet. Over-rotation makes traction very tricky in the wet. Also, put your On Throttle Diff down to 50 if it’s not already there for easiest traction.
Full Wet Conditions – Full heavy rain full wet conditions, add 3-5 clicks of wing to your dry setup, and also space them 3 clicks apart for better stability and traction out of corners. Soften your suspension and raise your ride height a few clicks, and 50 On Throttle Diff is a must for traction in the wet.
Here’s a baseline full wet controller race setup for Austria:
- Wings – 22/25
- Diff – 50/55
- Camber – -2.50/-1.00/0.00/0.10
- Suspension – 30-7-7-1-36-42
- Brakes – 95 Pressure/54 Bias
- Tyre pressures –Fronts 22.4/Rears 20.0
Other Setup Resources
There are different setup routes you can go down at Austria for sure, depending on input device and preference. My setups are quite idiosyncratic, so if you’re looking for some different setup resources to check out, here’s some options:
- F1laps.com Austria page – Another car setup forum with pages for every track, and loads of custom setups posted, both TT and race, all cars, all conditions.
- F1gamesetup.com – An even more specialized resource with custom setups, every car and every track, wet and dry weather.
Extra Driving/Racing Tips
Austria is an interesting track to race on, and it requires some strategic as well as racing nous to do well there in competitive leagues. Here are some additional considerations for racing there.
Weekend Format – Austria is actually the 2nd Sprint format weekend on the official F1 23 calendar, meaning you’ve only got one practice session before setups are locked and you’re straight into Qualifying for the Sprint Race, the results of which determines the grid for the main race. Get your setup dialled in early, and consider choosing the Harder Tyre Allocation to free up soft tyres for P1 if you want to prioritise qualifying pace.
Qualifying – Tyre wear is actually lower at Austria than other tracks, so you can actually get 2 good laps in in Quali on the same set of tyres (out-lap, flying lap #1, cool down lap, flying lap #2).
ERS – Despite the lower wing levels that are typically used here, ERS runs out very fast at Austria because of the long straights and how tempting it can be to use it. Use it very sparingly and strategically, and instead rely on raw pace and DRS as much as possible to avoid depleting it early on to the point where it’s very hard to recoup.
DRS trains – Related to the last point on ERS, sometimes it’s better here to strategically choose to NOT be the lead car in a pack in longer races, and instead fall back and use the DRS boost to save your own battery and sit behind another car for a few laps to re-charge. Then pick the right time to overtake once your own battery is recharged and your opponent’s are low on battery (flashing red light).
Tyre Strategy – The red soft tyre isn’t usable in 50% races – it’s a Medium-hard or hard-medium strategy. And it’s usually medium-hard that’s preferable, since the two tyres level off in terms of pace pretty quickly and going M-H allows you to have better tyres at the end of a long race, where doing a H-M strat, you’ll be on worn mediums at the end and will struggle to fight in the last few laps.
See here and here for two excellent examples of how to race cleverly and strategically in longer races at Austria, conserving ERS and making smart forward thinking strategy decisions to beat out the opposition.
