
The Jerez Circuit has been on the MotoGP calendar for several decades, and is a popular testing track as well. Therefore it’s very well known to any MotoGP and racing fans in general, but it can be a somewhat tricky circuit with a twisty and narrow layout.
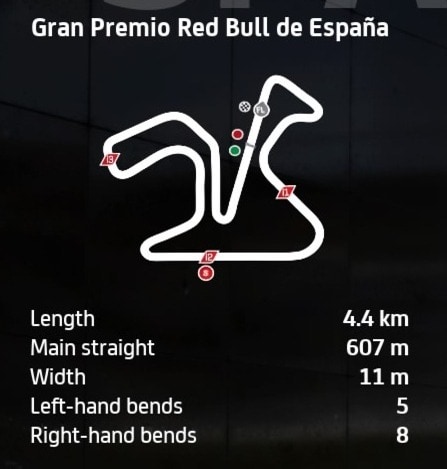
Whilst understanding the layout isn’t too hard – it’s mostly alternating pairs of right and left handers – it’s VERY easy to over-run corners on this track, so you need to get your braking and cornering mastered to map consistently in races without crashing.
I’ve spent quite a while practicing on this circuit, and was going back and forth between two different setups. In the end, I’ve opted for the “softer” setup as my favourite and easiest to control.
Also, check out the great new generic/starter MotoGP class setup I juts found, that’ll come in very useful for riding around tricky tracks like this one.
Here is a bike setup for the MotoGP class for Jerez:
- Suspension (Front Fork):
-
- Front pre-load – 3
- Oil Quantity – 2
- Front Spring Hardness – 3
- Front Swingarm compression – 2
- Front Swingarm extension – 1
-
- Rear Single Shock Absorber:
-
- Rear Pre-load – 5
- Swingarm connector – 3
- Rear spring hardness – 2
- Single shock absorber compression – 4
- Single shock absorber extension – 5
-
- Vehicle Geometry:
-
- Steering head inclination – 3
- Trail – 5
- Steering plate position – 5
- Rear swingarm length – 2
-
- Transmission:
-
- Gears (1-6) – 5-5-6-6-6-6
- Final ratio – 6
- Slipper clutch – 3
-
- Brakes:
-
- Front disc – 350 mm
- Rear disc – 220 mm
-
- ECU
-
- Traction control – 2
- Engine braking – 5
- Anti-wheelie – 3
- Power mapping – 2
-
For the ECU settings, the engine braking is bumped up to 5 and power mapping down to 2, as too much power was released on the accelerator when on 3 on the MotoGP class bikes, and it was pushing me wide too much.
This setup allowed me to lap the most consistently. It was configured nicely to coast round the multiple prolonged corners on this track. However it should also be said that this track does need quite a bit of practice to nail it.
Alternative Jerez MotoGP Class Bike Setup
If you prefer bike setups with harder suspension and geometry settings, here’s an alternate setup you can try for MotoGP bikes:
- Suspension (Front Fork):
-
- Front pre-load – 1
- Oil Quantity – 1
- Front Spring Hardness – 2
- Front Swingarm compression – 7
- Front Swingarm extension – 3
-
- Rear Single Shock Absorber:
-
- Rear Pre-load – 7
- Swingarm connector – 3
- Rear spring hardness – 3
- Single shock absorber compression – 3
- Single shock absorber extension – 7
-
- Vehicle Geometry:
-
- Steering head inclination – 4
- Trail – 4
- Steering plate position – 7
- Rear swingarm length – 4
-
- Transmission:
-
- Gears (1-6) – 7-7-7-6-5-4
- Final ratio – 6
- Slipper clutch – 7
-
- Brakes:
-
- Front disc – 350 mm
- Rear disc – 220 mm
-
- ECU
-
- Traction control – 2
- Engine braking – 4
- Anti-wheelie – 4
- Power mapping – 3
-
I did try this setup, but it didn’t feel as good for me round the corners. This is just my own riding style though so try it yourself and see if you prefer it to the softer setup above.
Jerez Setup For Moto2 and Moto3 Class Bikes
Jerez is definitely one of the those circuit where the less powerful Moto2 and Moto3 class bikes are MUCH easier to get around a tricky circuit like Jerez.
The lesser acceleration and braking requirements mean it’s easier to stay on the track on these bikes. Therefore there’s a bit less need to play around with setups.
However, if you want to try a custom setup for these bikes, check out our starter setups page for MotoGP 22, which also has basic setups for both the Moto2 and Moto3 class bikes. I’ll add any more specialised setups specifically for Jerez as I go along.
Tips For Riding Around Jerez
Here’s a couple of extra tips for riding around this narrow and sometimes tricky circuit:
Heavy Braking zones – Your three main braking zones where you really need to get the bike stopped early to avoid over-shooting the corners are the first and last corner, plus turn 6 after the short back straight. For these corners, start braking super early for the MotoGP class bikes, and be sure to get turned in early. Add some rear brake to the front if needed to increase stopping power and get the nose turned in. There’s some sharp corners on this track that are tricky to get right.
Restrained on accelerator – Jerez is really a track where you have to be really cautious and restrained on the accelerator. Apart from the two straights, the rest of the lap is mostly short dabs or squirts of the throttle on the super powerful MotoGP bikes, or coasting around longer corners on partial throttle. The Moto2 and Moto3 bikes are a little more forgiving, but it’s really easy to over-run corners by over-applying the power here.
