
The Kymi Ring circuit in Finland has been on several MotoGP games including ’22, but strangely has never actually been raced yet in real life MotoGP. It was due to take place all 3 years from 2020 to 2022, but was always cancelled for various reasons. And it’s unclear now whether it’ll ever return to the calendar.
This is a shame, because it’s a really good fun track to race on the games. Challenging and technical, yes, but great fun once you get used to it. And the MotoGP 22 game might be the last game for a while (or ever) that you get to race this track (it is also on the ’21 and ’20 games).
Regarding bike setup, you need something that’s stable for cornering for sure with all the uphill/downhill apexes. I did quite a lot of practice and testing at this circuit, and did eventually find a setup that worked better for me at least.
Here is a bike setup for the MotoGP class for Kymi Ring:
- Suspension (Front Fork):
-
- Front pre-load – 1
- Oil Quantity – 1
- Front Spring Hardness – 1
- Front Swingarm compression – 2
- Front Swingarm extension – 7
-
- Rear Single Shock Absorber:
-
- Rear Pre-load – 7
- Swingarm connector – 4
- Rear spring hardness – 4
- Single shock absorber compression – 4
- Single shock absorber extension – 7
-
- Vehicle Geometry:
-
- Steering head inclination – 1
- Trail – 3
- Steering plate position – 7
- Rear swingarm length – 1
-
- Transmission:
-
- Gears (1-6) – 4-5-6-6-5-4
- Final ratio – 4
- Slipper clutch – 7
-
- Brakes:
-
- Front disc – 355 mm
- Rear disc – 220 mm
-
- ECU
-
- Traction control – 2
- Engine braking – 4
- Anti-wheelie – 4
- Power mapping – 2
-
Regarding the brake disc, most players are using the 340 High Mass one for the front (one step lower). I’m using the biggest one because I want stopping power above all else right now, especially on a track like this where it’s very easy to over-run corners.
Alternate MotoGP Bike Setup For Kymi Ring
I did extensively test another setup alongside the above one plus the default and another template setup, and it worked OK for me but not quite as good as the above setup.
Here’s an alternate Kymi Ring setup for MotoGP class bikes:
- Suspension (Front Fork):
-
- Front pre-load – 1
- Oil Quantity – 1
- Front Spring Hardness – 1
- Front Swingarm compression – 5
- Front Swingarm extension – 7
-
- Rear Single Shock Absorber:
-
- Rear Pre-load – 7
- Swingarm connector – 4
- Rear spring hardness – 3
- Single shock absorber compression – 4
- Single shock absorber extension – 7
-
- Vehicle Geometry:
-
- Steering head inclination – 1
- Trail – 7
- Steering plate position – 7
- Rear swingarm length – 3
-
- Transmission:
-
- Gears (1-6) – 4-3-3-3-3-3
- Final ratio – 4
- Slipper clutch – 7
-
- Brakes:
-
- Front disc – 355 mm
- Rear disc – 220 mm
-
- ECU
-
- Traction control – 2
- Engine braking – 4
- Anti-wheelie – 4
- Power mapping – 3
-
It’s actually not a million miles away from the first setup, but did have a slightly different feel for me and I went for the first setup after some testing. However, bike handling and “feel” is subjective, so test it out to see if you prefer it.
Honestly though, I think the bigger challenge at Kymi Ring is mastering the track layout and tricky corners rather than the setup (more on this below).
Moto2 and Moto3 Bike Setups For Kymi Ring
If you’re riding the slower Moto2 and Moto3 bikes round here, it’s a lot easier to handle with less power and easier braking. The trickier sections become a lot easier to navigate as you’ve more time to react and see what’s coming with the slower acceleration.
If you’re looking for custom setups specifically for these bikes, check out our MotoGP 22 basic starter setups page which has starter setups for both Moto2 and Moto3 bikes. You can test these against and default setup and tweak to your liking and find improvements.
Tips For Riding Around Kymi Ring
Kymi Ring is a tricky circuit to consistently get right for sure on MotoGP bikes. I found it really fun once I did, but it took some time getting there. Here’s some extra tips for riding this track.
Learning the track – There are very specific technical sections of corners on this circuit that need learning. I found it easier to break the track up into 3 main sections and learn each of them separately.
Here’s how I memorize the track:
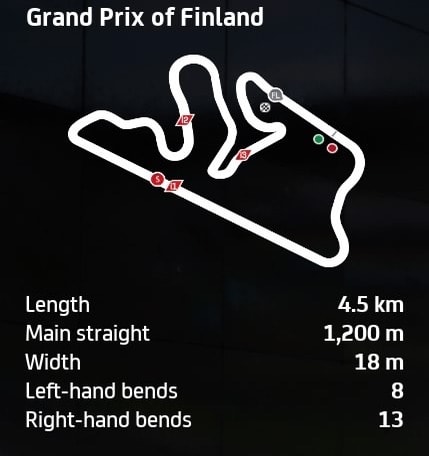
- First part – Right —- left curve —– Right hairpin (uphill) —– long straight
- Second part – Right hairpin ——right-left-right-double apex left——2 rights
- Third part – Right—left hairpin—-Left hairpin–right (coat hanger section) —– Right hairpin (downhill)
I call the last section the coat hanger section because that’s what it looks like on the map – a coat hanger without the hook! It helps me visualize how the corners go.
Accelerator – You’ve really only got the short pit straight and the long back straight where you’re able to open up and nail the accelerator. Everywhere else on the track, restraint on the power is crucial to avoid over-running corners, especially on MotoGP class bikes. And I brake super early for these two straights as well. Apart from those two straights it’s largely just very short squirts or dabs on the power, or even just coasting up to the next braking/turn-in point off the power. Over-use the accelerator and you’re guaranteed to over-run corners on this tricky circuit.
“Esses” – That snaking section just after the long straight is really tricky to nail and it’s downhill and somewhat unsighted which makes it harder. Restraint and accuracy are key here – stay off the power or just very slight dabs as you move down the hill. It’s super easy to go in too hot here and also lock the brakes and fall off the bike. Takes some practice to get used to, but I found it has a nice rhythm once you do.
Braking – The undulation on this circuit also make the braking and turning more tricky. Because you’re leaning over more on some of the sharp hairpins, plus going uphill or downhill, it’s easier to over-do it and fall off. Again I found restraint on the accelerator, slowly coasting up to braking zones or just dabbing on the power, and getting turned in early enough are key to build rhythm and stay on the bike here. And for downhill braking zones, starting applying the brakes even earlier than you normally would.
