
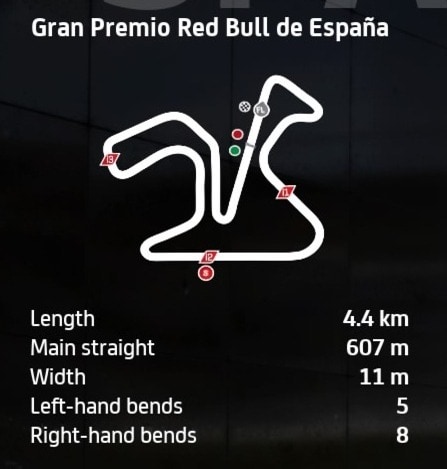
The Jerez circuit in southern Spain has been a longstanding racing and testing track for various racing formulas including MotoGP. But it’s a narrow, tight, twisty circuit that’s hard to get consistently right lap after lap.
The run off areas are full of gravel traps and will punish you brutally if you run even a little bit wide. Therefore you need to know the layout very well, but also have a setup that’s good on the brakes to get you properly stopped for the corners.
Mercifully, Jerez is easier on MotoGP 23 than it was on it’s predecessor MotoGP 22. But it’s still not a particularly easy track in itself, though I did test a setup that seemed to work quite well.
Here’s the setup for MotoGP class bikes for MotoGP 23 for Jerez:
- Suspension (Front Fork):
-
- Front pre-load – 2
- Oil Quantity – 1
- Front Spring Hardness – 4
- Front Swingarm compression – 4
- Front Swingarm extension – 3
-
- Rear Single Shock Absorber:
-
- Rear Pre-load – 4
- Swingarm connector – 4
- Rear spring hardness – 2
- Single shock absorber compression – 4
- Single shock absorber extension – 3
-
- Vehicle Geometry:
-
- Steering head inclination – 2
- Trail – 4
- Steering plate position – 3
- Rear swingarm length – 5
-
- Transmission:
-
- Gears (1-6) – 5-5-4-4-4-4
- Final ratio –5
- Slipper clutch – 7
-
- Brakes:
-
- Front disc – 355 mm
- Rear disc – 220mm
-
- ECU
-
- Traction control – 5
- Engine braking – 4
- Anti-wheelie – 5
- Power mapping – 2
-
This setup provides excellent stopping power to avoid over-running the corners, and it didn’t take me too long to get up to speed lapping pretty consistently using this.
More advanced players might want to set a lower TC value for their ECU, running something like 1542 or 2542. But I prefer a higher TC value right now as it gets rid of that annoying understeer on corner exit you’ll find with default setups.
Alternative Jerez MotoGP Class Bike Setup
I did also test another setup that is quite close to the first one in terms of configuration, and honestly I couldn’t find much difference between them. I was lapping with roughly the same pace and consistency using both setups.
It’s just a mod of my template setup for this game that I always start with. Here it is:
- Suspension (Front Fork):
-
- Front pre-load – 2
- Oil Quantity – 3
- Front Spring Hardness – 4
- Front Swingarm compression – 3
- Front Swingarm extension – 3
-
- Rear Single Shock Absorber:
-
- Rear Pre-load – 4
- Swingarm connector – 3
- Rear spring hardness – 2
- Single shock absorber compression – 3
- Single shock absorber extension – 3
-
- Vehicle Geometry:
-
- Steering head inclination – 4
- Trail – 4
- Steering plate position – 3
- Rear swingarm length – 5
-
- Transmission:
-
- Gears (1-6) – 5-4-4-4-4-3
- Final ratio –4
- Slipper clutch – 7
-
- Brakes:
-
- Front disc – 355 mm
- Rear disc – 220mm
-
- ECU
-
- Traction control – 5
- Engine braking – 4
- Anti-wheelie – 3
- Power mapping – 2
-
Again, it’s only a few of the parameters changed, but test it out if you like and see if you feel more consistent using it. For me, the two setups are about the same and it’s more about learning the track layout to get consistent.
Moto2 and Moto3 Bike Setups For Jerez
The slower Moto2 and Moto3 bikes are more forgiving around a track like Jerez, as you’ve got a bit more time to prepare for corners and correct slight mistakes (although like MotoGP, any big mistakes and you’re going to be in the gravel on this circuit).
Check out our MotoGP 23 generic setups page for starter setups for these bikes that you can bolt on and test against the default game setup to find improvements.
Tips For Riding Around Jerez
Jerez is a really tricky circuit to nail – it’s one of those circuits where you have to be quite boring and restrained and can hardly let rip on the throttle at all. Apart from the pit straight and the back straight it’s really just short dabs and bursts on the power on MotoGP bikes.
But I found it fun to lap once I got into a rhythm on MotoGP 23 with the easier braking. Here’s some extra tips for riding around here.
Layout – For learning the track layout, I find it’s good to see the first 80% of the track as simply alternating pairs of right and left handers – two rights, two lefts, two rights, two lefts, two rights. Then it’s just the two faster right hand kinks and the sharp left hairpin to finish the lap.
Braking technique – It’s always advised to err on the side of braking too early rather than too late on this track. Over-run corners and you’ll likely end up in a gravel trap and fall off. Also, this game doesn’t like it at all if you try to apply the front brake when the car is leaning. Use the front front when upright only, then release and use the rear brake on it’s own to rotate the bike into sharp corners if needed. Also when applying the front brake hard, take several stabs at it as lock-ups are common if you hold on the front brake too long.
Turn 1/2 – Braking point is as soon as you cross the start-finish line. Brake hard, and then for turn 2 you brake as soon as you reach the overhead sign.
Back straight – On MotoGP bikes this is just a short burst, and you need to start braking quite early – before the DHL overhead sign – as it’s a sharp corner at the end of it.
Turns 11/12 – These are the two faster right handers before the last corner. You can make up a lot of time if you get them right. For turn 11, brake just after you pass the overhead Red Bull sign, and then it’s just the very briefest dab on the power before you need to lift and lean in for turn 12. You can use the rear brake on it’s own to get the bike tucked into these corners, but there’s gravel traps on the outside to catch you out if you carry in too much speed.
Turn 13 – Last corner. Can crash the bike here if you apply the front brake while also leaning. Brake early in a straight line, and then release and use the rear brake to tuck the bike into this very tight final hairpin.
Mastering Jerez Video
