
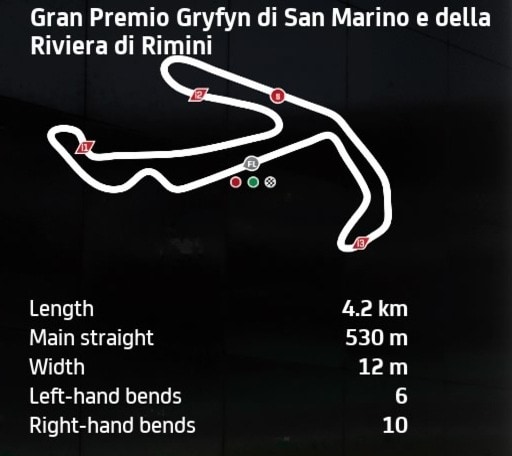
The Misano circuit has been on the MotoGP calendar since the mid 2000s, and is quite a unique and technical track with tricky sections of successive corners.
For a bike setup, you need something that’s got good leaning characteristics that suit your style for sure, plus strong braking force.
Whilst it can be a bit of a challenge getting used to the circuit layout, I did test a couple of setups that worked reasonably well, the best one being a close mod of the template setup I normally start with.
Here is a bike setup for the MotoGP class for MotoGP 23 for Misano:
- Suspension (Front Fork):
-
- Front pre-load – 2
- Oil Quantity – 3
- Front Spring Hardness – 4
- Front Swingarm compression – 3
- Front Swingarm extension – 3
-
- Rear Single Shock Absorber:
-
- Rear Pre-load – 4
- Swingarm connector – 3
- Rear spring hardness – 2
- Single shock absorber compression – 3
- Single shock absorber extension – 3
-
- Vehicle Geometry:
-
- Steering head inclination – 4
- Trail – 4
- Steering plate position – 3
- Rear swingarm length – 5
-
- Transmission:
-
- Gears (1-6) – 5-5-5-4-4-4
- Final ratio – 4
- Slipper clutch – 7
-
- Brakes:
-
- Front disc – 355 mm
- Rear disc – 220mm
-
- ECU
-
- Traction control – 5
- Engine braking – 4
- Anti-wheelie – 3
- Power mapping – 2
-
It’s just my baseline setup adapted from stronger braking power as it’s easy to overshoot some of the corners here.
For the ECU settings, some players like to use a lower TC value, so it’s something like 1542 or 2542. But I need a higher TC value to get rid of the annoying understeer on corner exit you can get on this game.
Alternative Misano GP Class Setup
I did also find and test another setup which uses slightly stiffer values for some of the suspension and geometry settings. Here it is:
- Suspension (Front Fork):
-
- Front pre-load – 7
- Oil Quantity – 1
- Front Spring Hardness – 6
- Front Swingarm compression – 1
- Front Swingarm extension – 6
-
- Rear Single Shock Absorber:
-
- Rear Pre-load – 6
- Swingarm connector – 2
- Rear spring hardness – 3
- Single shock absorber compression – 4
- Single shock absorber extension – 5
-
- Vehicle Geometry:
-
- Steering head inclination – 4
- Trail – 5
- Steering plate position – 4
- Rear swingarm length – 5
-
- Transmission:
-
- Gears (1-6) – 5-5-5-4-4-4
- Final ratio –4
- Slipper clutch – 7
-
- Brakes:
-
- Front disc – 355 mm
- Rear disc – 220mm
-
- ECU
-
- Traction control – 5
- Engine braking – 4
- Anti-wheelie – 3
- Power mapping – 2
-
This setup didn’t quite feel as easy to control or be consistent with as the first setup, but it was still OK. Test it out to see if you prefer it.
Moto2 and Moto3 Setups
The slower Moto2 and Moto3 bikes are more forgiving around a twisty, technical circuit like Misano, and you’ve more time to react to what’s coming and to correct small mistakes versus the brutally unforgiving MotoGP bikes.
If you’re looking for custom setups for these bikes, check out our generic setups page for MotoGP 23, which has generic starter setups for these bike classes as well to test against the game default to find improvements.
Bonus Tips For Riding Around Here
Misano is a tricky track to get all the corners nailed on one single lap for sure, but it actually can be quite fun to ride once you’ve got into a rhythm and know what’s coming next.
Here are some extra tips for navigating this circuit:
Braking technique – This game does not like it at all when you try to apply the front brake while also leaning, and there’s a lot of consecutive corners on this track which can catch you out in this regard. Aim to get all your front braking done in a straight line when the bike is upright, and then optionally apply small dabs of rear brake on it’s own to tuck the bike further into corners if needed.
Turn 1 – Braking point is just before you reach the second overhead sign. Brake hard with the front brake then release and lean in, and then extra rear brake can help lean the bike in more if needed. More generally, sector 1 follows a right-left-right—-right-right-left sequence, with all the corners closely following each other, so be cautious and sparing on the throttle to avoid over-running corners.
Turn 8 – This is the sharp left hairpin after the short straight. Braking point is later this year, just after you pass the overhead sign. But you need to get slowed right down as it’s a very sharp hairpin – take several dabs on the front brake to scrub off speed. Use the rear brake on it’s own as well to tuck the bike in if needed.
Back straight – You’ve got a short blast on the power before you’ve got two high speed right hand “kinks”. Braking point for the first one is as you pass the pole on your right, and the kerbing starts on your left. Briefly apply the front brake, then lean into the first kink, then a very short dab on the power and lean in for the second one as well. Then it’s two more right handers that follow right after, with the second one being a very sharp hairpin that you need to get slowed right down for. It’s easy to over-apply the accelerator for these corners and run wide on MotoGP bikes especially, so restraint on the power is advised.
Mastering Misano – Track Guide
