
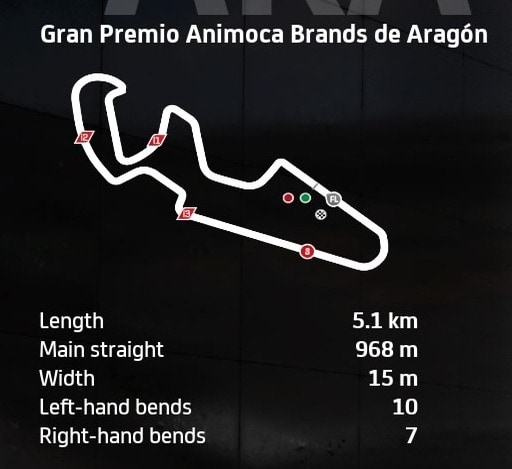
The Motorland Aragón circuit first debuted on the MotoGP calendar in 2010, although it now only hosts races every other year or so. It’s a pretty simple track to learn in terms of the layout, but hard to really master as there’s some seriously tricky corners and braking zones. It took me ages just to put together a clean non invalidated lap in Time Trial.
In terms of setup you need something that’s good under braking, both in a straight line and while slightly leaning/turning. And regardless of the setup you use, this track needs a LOT of practice to get good at.
Here is a bike setup for the MotoGP class for Aragón:
- Suspension (Front Fork):
-
- Front pre-load – 4
- Oil Quantity – 4
- Front Spring Hardness – 4
- Front Swingarm compression – 7
- Front Swingarm extension – 4
-
- Rear Single Shock Absorber:
-
- Rear Pre-load – 7
- Swingarm connector – 4
- Rear spring hardness – 4
- Single shock absorber compression – 4
- Single shock absorber extension – 7
-
- Vehicle Geometry:
-
- Steering head inclination – 4
- Trail – 4
- Steering plate position – 7
- Rear swingarm length – 4
-
- Transmission:
-
- Gears (1-6) – 7-7-7-5-4-3
- Final ratio – 5
- Slipper clutch – 7
-
- Brakes:
-
- Front disc – 355 mm
- Rear disc – 220 mm
-
- ECU
-
- Traction control – 3
- Engine braking – 5
- Anti-wheelie – 4
- Power mapping – 2
-
This was just about the best setup out of 4 or 5 I tried in terms of consistency and lap time. But honestly, no setup I tested made this circuit “easy”. It’s just a hard track to get right, with strange braking zones that are really hard to nail lap after lap (more on this below). But this setup made it the least difficult!
Alternate MotoGP Bike Setup For Aragón
I did save another setup that kind of worked for me, but again I wouldn’t say it made the track easy.
Here’s an alternate bike setup for the MotoGP class for Aragón
- Suspension (Front Fork):
-
- Front pre-load – 1
- Oil Quantity – 1
- Front Spring Hardness – 1
- Front Swingarm compression – 4
- Front Swingarm extension – 3
-
- Rear Single Shock Absorber:
-
- Rear Pre-load – 6
- Swingarm connector – 2
- Rear spring hardness – 7
- Single shock absorber compression – 5
- Single shock absorber extension – 4
-
- Vehicle Geometry:
-
- Steering head inclination – 2
- Trail – 3
- Steering plate position – 4
- Rear swingarm length – 3
-
- Transmission:
-
- Gears (1-6) – 4-4-4-4-5-4
- Final ratio – 6
- Slipper clutch – 7
-
- Brakes:
-
- Front disc – 340 mm (High Mass)
- Rear disc – 220 mm
-
- ECU
-
- Traction control – 2
- Engine braking – 4
- Anti-wheelie – 4
- Power mapping – 2
-
This setup felt good round some of the corners, especially turns 3 through to 8/9, but wasn’t as easy for me to be consistent with as the first setup. Setups and bike feel is subjective to each player though, so test it out and see what you think.
Honestly, I think on this track the bigger challenge is just lapping the track correctly without over-running or falling off, and this difficulty remains regardless of the setup you use. It’s just a hard circuit to master in my opinion.
Moto2 and Moto3 Bike Setups For Aragón
The Moto2 and Moto3 bikes don’t have such insane acceleration, so you’ve a little more time to react for braking which really helps on a tricky track like this.
If you’re wanting setups for these bikes, check out our generic setups page which has starter setups for both Moto2 and Moto3 bikes that you can load up and test against a default to find more time.
Beware though that on all classes of bikes, Aragón is quite tricky and takes some real practice to get used to.
Tips For Riding Around Aragón
This track is one of hardest on the entire game in my opinion. You’ve got a couple of really tricky downhill braking zones where the racing line also changes right as you’re slowing down. Here’s some extra tips on some key corners.
Turn 1 – You need to brake super early for this corner, like before you even reach the overhead sign. I also use both the front and rear brake as this first turn is deceptively sharp and you need to scrub off more speed than you might think to get properly turned in.
Exit Turn 3 – The run from turn 2 to turn 5 is satisfying when you get it right. Coming out of turn 3, it’s a short blast on the straight and lift and coast through the left-link of turn 4 into the sharp left hairpin of turn 5. Good braking is needed to get the bike leaned in to 5 properly (use the rear brake as well if you can).
Turn 8/9 (corkscrew) – The corkscrew right-left hairpin section of 8/9 is also downhill, so you need to brake earlier than normal to avoid over-shooting.
Turn 12 – I think this is the hardest corner on the entire track. If you have the racing line turned on, I start to lift and brake as soon as the blue line starts to move close to the green astro-turf on the left. The racing line also moves right as you need to start braking so I’d largely ignore it in terms of line and just stay in the middle of the track. Turn 12 is also another deceptively sharp corner so you need to get the bike slowed down with the rear brake as well, to get turned in properly. The turn 14 right hander is also quite sharp and easy to over-run if you’re carrying too much speed.
Turn 16 – This is actually a long, double apex left hander to finish the lap. For braking on MotoGP class bikes, once I reach 6th gear on the long straight, I continue for another 1-1.5 seconds, then lift off and start applying the front and rear brake. There’s different ways of doing this corner, but I like to go a bit deeper (without over-running) to get a good run onto the pit straight. You can also cut the inside kerb onto the start-finish a bit for a straighter line.
