
The Chang circuit in Thailand is a relatively new addition to the MotoGP calendar, debuting in 2018. It reminds me a lot of the Rio Hondo Termas Circuit in Argentina, in that’s quite wide and the corners are quite forgiving with a lot of run off areas where you can recover the bike.
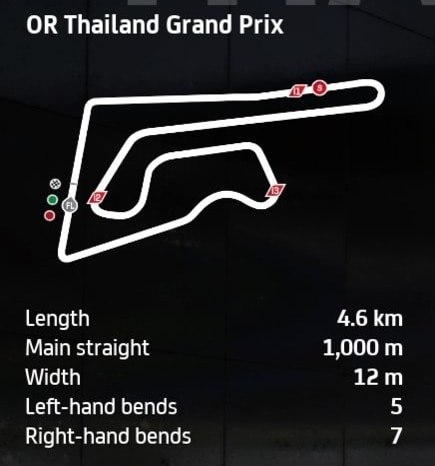
For this reason, I think it’s a decent easier circuit for beginners to practice on the learn the handling of the MotoGP games. It’s not a difficult layout to learn and about half of the lap is spent on full throttle, so it’s just about nailing your braking zones.
Regarding bike setup, I spent a lot of time on this track alternating between several different setups (I also found this circuit addictive once I got used to the layout – I just wanted to keep doing laps and laps).
But in the end, I actually went for a very close mod of my Valencia setup, as it’s really easy to ride and is stable under leaning and braking.
Here is my main bike setup for the MotoGP class for the Chang Circuit:
- Suspension (Front Fork):
-
- Front pre-load – 4
- Oil Quantity – 4
- Front Spring Hardness – 4
- Front Swingarm compression – 7
- Front Swingarm extension – 4
-
- Rear Single Shock Absorber:
-
- Rear Pre-load – 7
- Swingarm connector – 4
- Rear spring hardness – 4
- Single shock absorber compression – 4
- Single shock absorber extension – 7
-
- Vehicle Geometry:
-
- Steering head inclination – 4
- Trail – 5
- Steering plate position – 7
- Rear swingarm length – 5
-
- Transmission:
-
- Gears (1-6) – 4-5-5-5-4-4
- Final ratio – 5
- Slipper clutch – 7
-
- Brakes:
-
- Front disc – 355 mm
- Rear disc – 220 mm
-
- ECU
-
- Traction control – 3
- Engine braking – 5
- Anti-wheelie – 4
- Power mapping – 2
-
Alternative Chang Circuit MotoGP Class Bike Setup #1
This was originally my primary Chang setup, but after testing my Valencia setup and finding it even better, this one drops down to second place.
Here is an alternate bike setup for the MotoGP class for the Chang Circuit:
- Suspension (Front Fork):
-
- Front pre-load – 3
- Oil Quantity – 2
- Front Spring Hardness – 3
- Front Swingarm compression – 4
- Front Swingarm extension – 2
-
- Rear Single Shock Absorber:
-
- Rear Pre-load – 5
- Swingarm connector – 3
- Rear spring hardness – 6
- Single shock absorber compression – 4
- Single shock absorber extension – 2
-
- Vehicle Geometry:
-
- Steering head inclination – 1
- Trail – 3
- Steering plate position – 5
- Rear swingarm length – 3
-
- Transmission:
-
- Gears (1-6) – 4-5-5-5-4-4
- Final ratio – 5
- Slipper clutch – 7
-
- Brakes:
-
- Front disc – 355 mm
- Rear disc – 220 mm
-
- ECU
-
- Traction control – 2
- Engine braking – 5
- Anti-wheelie – 4
- Power mapping – 2
-
There’s some sharp hairpin turns on this track that it can benefit you having a softer, more grippy setup.
Also, with the long straight and several heavy braking zones, you need strong stopping power, hence the engine braking set to 5, plus the strongest brake discs.
Alternative Chang Circuit MotoGP Class Bike Setup #2
There’s another setup I was testing for this track that also sometimes delivered lap times very close to the first setup. But for me at least it had a slightly different feel to it and was a bit harder to be consistent with.
- Suspension (Front Fork):
-
- Front pre-load – 1
- Oil Quantity – 1
- Front Spring Hardness – 1
- Front Swingarm compression – 5
- Front Swingarm extension – 7
-
- Rear Single Shock Absorber:
-
- Rear Pre-load – 7
- Swingarm connector – 4
- Rear spring hardness – 3
- Single shock absorber compression – 4
- Single shock absorber extension – 7
-
- Vehicle Geometry:
-
- Steering head inclination – 1
- Trail – 7
- Steering plate position – 7
- Rear swingarm length – 3
-
- Transmission:
-
- Gears (1-6) – 5-5-4-4-3-3
- Final ratio – 5
- Slipper clutch – 7
-
- Brakes:
-
- Front disc – 350 mm
- Rear disc – 220 mm
-
- ECU
-
- Traction control – 2
- Engine braking – 4
- Anti-wheelie – 4
- Power mapping – 3
-
Bike setups are still very individual and all about feel, so try this one as well if you like and see if you prefer it.
For Moto2 and Moto3 Class Bike Setups For Chang Circuit
The less powerful Moto2 and Moto3 bikes are easier to control around here, especially for the braking zones. You’re arriving at such insane speed as you are with the MotoGP bikes, so it’s easier to get the bike stopped and leaned in.
If you want some custom bike setups for these classes, check out our base starter setups page which has custom configurations for both Moto2 and Moto3 bikes you can try as a starting point. I’ll post any other bespoke setups here if I find them.
Tips For Riding Around Chang
Here’s some extra tips for nailing the Chang International Circuit and getting consistent on it.
Heavy Breaking Zones – Turns 1, 2, 3 and 12 (last turn) all need heavy braking and turns 2 and 12 are also tricky sharp hairpins where you need to get the bike speed down to get it turned in. Get your braking points nailed for these corners and I personally also find using the rear brake to complement the front works for all these corners to help get the bike turned in better. You also need to brake very early for turns 1, 2 and 3 when using the very powerful MotoGP bikes. Thankfully there are some overhead advertising boards for turns 2 and 3 that give you a rough reference point.
Sharp Corners – As well as good braking technique, you need good cornering technique on this track as there’s some very sharp hairpins that it’s tricky to get right. Turn 2 after the massive straight, and the last turn are the main two there you really need to get the bike stopped properly to get it turned in. Use the rear brake to help with this, and also coast up to the braking zone for the last turn as it’s really tricky and easy to over-run this tight hairpin, which compromises your exit onto the pit straight for the next lap.
Last Turn – Really tricky to nail the braking point for this one, and you to get slowed right down as it’s a very sharp hairpin. The racing line isn’t much help here. I start coasting as soon as the large “Chang” signs on your left come into view, using the front brake initially and then adding some rear brake if needed to help get the bike leaned into the very sharp last turn. I think consistency is more important on this corner rather than pushing to gain lap time, as it’s really easy to over-run this corner.
