
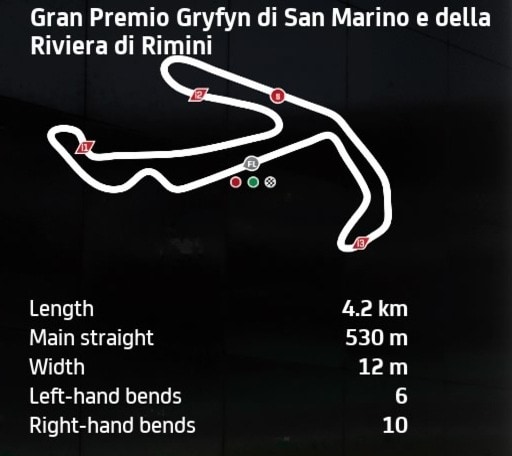
The Misano circuit has been on the MotoGP calendar in several different stretches, most recently as the San Marino Grand Prix from 2007 onwards. It’s a tight, twisty, technical circuit with lots of successive corners that need precise braking and turn in to get right.
It took me a while to get used to, but I found it a fun circuit to ride once I did. It’s possible to at least get consistent here, where you’re not falling off the bike much even if you’re not blisteringly fast.
Having a good setup helps with this, and I actually tested two setups that both worked well. The new generic GP class setup I’ve just updated also works very well at this track. But the last one I tried is the one I eventually went for and saved as my Misano setup.
Here is a bike setup for the MotoGP class for Misano:
- Suspension (Front Fork):
-
- Front pre-load – 4
- Oil Quantity – 4
- Front Spring Hardness – 4
- Front Swingarm compression – 7
- Front Swingarm extension – 4
-
- Rear Single Shock Absorber:
-
- Rear Pre-load – 7
- Swingarm connector – 4
- Rear spring hardness – 4
- Single shock absorber compression – 4
- Single shock absorber extension – 7
-
- Vehicle Geometry:
-
- Steering head inclination – 4
- Trail – 4
- Steering plate position – 7
- Rear swingarm length – 5
-
- Transmission:
-
- Gears (1-6) – 7-7-7-6-5-4
- Final ratio – 5
- Slipper clutch – 7
-
- Brakes:
-
- Front disc – 355 mm
- Rear disc – 220 mm
-
- ECU
-
- Traction control – 2
- Engine braking – 5
- Anti-wheelie – 4
- Power mapping – 2
-
Once I got used to the track layout, I could lap most consistently and post the fastest times with this setup. But setups and bike handling are very subjective so also try out the second setup below if you want, which has totally different settings parameters but can deliver similar lap times.
Alternate MotoGP Bike Setup For Misano
I did test another setup that was also pretty good, with a “softer” feel to the suspension. I could go a bit faster with the first setup above though.
Here’s an alternate bike setup for the MotoGP class for Misano:
- Suspension (Front Fork):
-
- Front pre-load – 3
- Oil Quantity – 1
- Front Spring Hardness – 2
- Front Swingarm compression – 3
- Front Swingarm extension – 3
-
- Rear Single Shock Absorber:
-
- Rear Pre-load – 4
- Swingarm connector – 4
- Rear spring hardness – 3
- Single shock absorber compression – 5
- Single shock absorber extension – 3
-
- Vehicle Geometry:
-
- Steering head inclination – 2
- Trail – 3
- Steering plate position – 7
- Rear swingarm length – 5
-
- Transmission:
-
- Gears (1-6) – 5-6-7-6-4-3
- Final ratio – 3
- Slipper clutch – 7
-
- Brakes:
-
- Front disc – 355 mm
- Rear disc – 220 mm
-
- ECU
-
- Traction control – 2
- Engine braking – 4
- Anti-wheelie – 4
- Power mapping – 2
-
Moto2 and Moto3 Bike Setups For Misano
The less powerful and slower Moto2 and Moto3 class bikes are easier to handle around a track like Misano. You’ve got more time to prepare for braking zones and slightly more margin for error than the insanely fast accelerating MotoGP bikes.
If you’re looking for setups for these bikes, see our generic setups page for MotoGP 22 which also gives you starter setups for Moto2/Moto3 bikes which you can test against a default to see if you can gain some lap time.
You can also try porting across the MotoGP setups as far they’ll fit (there are some difference between the settings parameters for the different classes), but this is kind of hit and miss and won’t always work.
Tips For Riding Around Misano
Misano is a tricky circuit to get right, but good fun once you do. Having a bike setup you’re comfortable with is half the battle won, but here’s some extra tips on riding certain parts of this track.
Turn 1 – Braking point for me at least is right between the 2 overhead signs. Brake hard with both the front and rear brake if needed. Then the rest of sector 1 is just a technical, twisty right-left-right then right-right-left sequence. It’s just very small dabs on the power, or even just coasting to the next apex, with this sector. Watch out especially for the turn 4 right hairpin, which is deceptively sharp and you need to slow right down to get turned in for this corner, after which you immediately lean right again for turn 5.
Turn 8 – This is the left hairpin after the short straight. Braking point is right when you reach the Red Bull overhead sign. The corner is again sharper than it looks on the map, so you need to get slowed right down to make it (use some rear brake if needed).
Back straight – This isn’t flat out as it’s broken up by two right “kinks”. Your braking/turning point for the first of these is just as you reach the kerbing on the left. Once you pass the second kink, stay off the power as the braking point for the next right hander is immediately after. Then another sharper right hairpin also immediately follows – short dab before braking for this.
Careful on power – As with most tracks on this game, you’re not on full throttle very long here. You’ve got 3 short straights – the pit straight, the straight to turn 8 and the first half of the back straight – on full accelerator. But none of them are very long and the rest of the lap it’s very technical, dab-and-coast sections where you’ve got to be super restrained on the power to avoid over-running corners.
