
The Termas Rio Hondo circuit in Argentina has been on the MotoGP calendar since 2014. And it’s a great track for beginners to get stuck into on the MotoGP games, because it’s one of the simpler ones to learn.
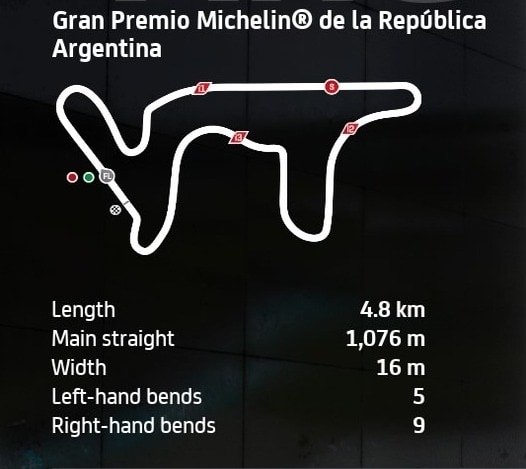
With a very wide track and long, sweeping corners that aren’t really that challenging you just need a setup that’s got good leaning characteristics and is stable under heavy braking.
And for me at least, just a very slight tweak to the template setup I’ve been starting out with on most tracks worked great around Rio Hondo.
- Suspension (Front Fork):
-
- Front pre-load – 2
- Oil Quantity – 3
- Front Spring Hardness – 4
- Front Swingarm compression – 3
- Front Swingarm extension – 3
-
- Rear Single Shock Absorber:
-
- Rear Pre-load – 4
- Swingarm connector – 3
- Rear spring hardness – 2
- Single shock absorber compression – 3
- Single shock absorber extension – 3
-
- Vehicle Geometry:
-
- Steering head inclination – 4
- Trail – 4
- Steering plate position – 3
- Rear swingarm length – 5
-
- Transmission:
-
- Gears (1-6) – 5-5-4-4-4-4
- Final ratio – 4
- Slipper clutch – 7
-
- Brakes:
-
- Front disc – 355 mm
- Rear disc – 220mm
-
- ECU
-
- Traction control – 5
- Engine braking – 4
- Anti-wheelie – 5
- Power mapping – 2
-
This setup worked great and with the easier braking on MotoGP 23, it didn’t take too long to get up to speed and lapping pretty consistently.
For the brakes, you can use the 355 mm thickest front disc if you want, but it can make the bike a little more unstable under braking and you might prefer the 340 High Mass one. I initially used the High Mass, but then switched back to the 355 mm one when I came back to this track having got more used to the game and the braking physics.
Also some players are using 1542 or 2542 ECU settings, but I use a higher TC value to get rid of the annoying understeer that’s on the default game setup.
Alternate MotoGP Bike Setup For Rio Hondo
I did also try a different bike setup with different settings parameters, but it didn’t work so well at least for me around Argentina.
Here’s an alternate MotoGP class bike setup for Rio Hondo:
- Suspension (Front Fork):
-
- Front pre-load – 4
- Oil Quantity – 1
- Front Spring Hardness – 2
- Front Swingarm compression – 4
- Front Swingarm extension – 3
-
- Rear Single Shock Absorber:
-
- Rear Pre-load – 2
- Swingarm connector – 4
- Rear spring hardness – 3
- Single shock absorber compression – 4
- Single shock absorber extension – 3
-
- Vehicle Geometry:
-
- Steering head inclination – 2
- Trail – 4
- Steering plate position – 3
- Rear swingarm length – 4
-
- Transmission:
-
- Gears (1-6) – 5-5-4-4-4-4
- Final ratio – 4
- Slipper clutch – 6
-
- Brakes:
-
- Front disc – 355 mm
- Rear disc – 220 mm
-
- ECU
-
- Traction control – 5
- Engine braking – 4
- Anti-wheelie – 5
- Power mapping – 2
-
For me, this setup did feel as good under leaning and braking and I wasn’t as consistent with it. Try it out yourself though and see what you think as setups and bike handling is subjective from player to player.
Moto2 and Moto3 Setups For Rio Hondo Circuit
If you’re starting out using the less powerful Moto 2 or Moto3 bikes, check out our baseline/template setups page for MotoGP 23 for generic starter setups you can bolt onto these bikes and test against the default game setup.
These bikes have less acceleration and top speed, but also less braking power. But overall, they are generally easier to control than the MotoGP bikes and on a wide open, easy layout like Rio Hondo, they can be a great way to build up confidence on the game.
Tips For Riding Around Rio Hondo Circuit
There isn’t a massive amount more to say about the Termas Rio Hondo track, as it’s pretty easy to learn and has massive run off areas that are quite forgiving. It’s a great track to add to a short custom Championship along with some other simple tracks, to get used to the game.
However, here’s a few pointers for specific corners:
Turn 3 – This is the right kink as you exit the left hairpin of turn 2. On MotoGP bikes, it’s just the very lightest dab on the power out of 2, before you lift and lean into the apex of turn 3 and then back on the accelerator as soon as possible. You can gain a lot of lap time if you nail this corner by turning in at just the right point.
Turn 5 – The right hairpin after the massive straight. Braking point is the overhead sign. If you keep over-running this corner, consider using a thicker front brake disc.
Exit Turn 6 – This is the long looping left after the turn 5 hairpin, and is somewhere you can lose the bike if you’re not careful. Be sure to only apply the brake when the bike is fully upright, not still leaning coming out of 6. This game doesn’t like it when you apply the front brake when also leaning.
