
The Circuit de Catalunya in Barcelona has been a fan favourite for years and is actually one of several tracks in Spain the the MotoGP calendar. The circuit is great fun to ride on these bikes on MotoGP 23 and I would also class it as one of the easier tracks to learn and get consistent on.
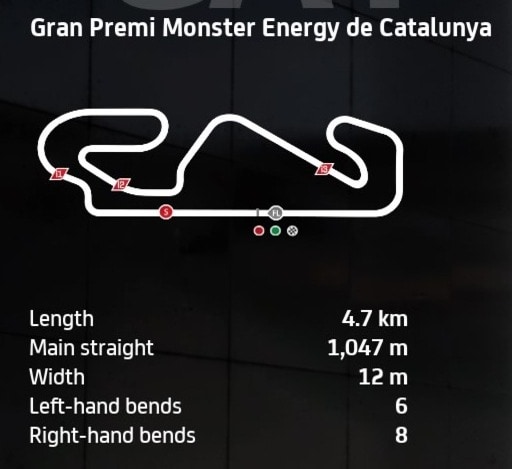
With a massive long pit straight and some sharp corners, you need a setup that’s good under braking for sure, to get the bike leaned into the turns. And I actually tested a few setups that were good around Catalunya, but one in particular stood out.
Here’s the setup for MotoGP class bikes for MotoGP 23 for Catalunya:
- Suspension (Front Fork):
-
- Front pre-load – 7
- Oil Quantity – 1
- Front Spring Hardness – 6
- Front Swingarm compression – 1
- Front Swingarm extension – 6
-
- Rear Single Shock Absorber:
-
- Rear Pre-load – 6
- Swingarm connector – 5
- Rear spring hardness – 4
- Single shock absorber compression – 5
- Single shock absorber extension – 5
-
- Vehicle Geometry:
-
- Steering head inclination – 3
- Trail – 4
- Steering plate position – 3
- Rear swingarm length – 5
-
- Transmission:
-
- Gears (1-6) – 5-4-4-4-4-3
- Final ratio – 4
- Slipper clutch – 7
-
- Brakes:
-
- Front disc – 355 mm
- Rear disc – 220mm
-
- ECU
-
- Traction control – 5
- Engine braking – 4
- Anti-wheelie – 3
- Power mapping – 2
-
This setup delivered really good lap times for me and was also pretty consistent and easy to ride. I find the Catalunya track great fun to ride on this game, and it only took me a handful of laps to get up the speed and lap the circuit without crashing.
Some players prefer to use a lower TC setting on their ECU – something like 1542 or 2542. But otherwise the setup should be a good baseline to get started with and tweak to your preference.
Alternative Catalunya MotoGP Class Bike Setup
I did also test another setup that was also very easy to control and be consistent with, but slightly slower than the above setup. It’s basically just a slight mod of my baseline setup that I start on most tracks with, adjusted for stronger braking power.
Here’s an alternate MotoGP class bike setup for Catalunya on MotoGP 23:
- Suspension (Front Fork):
-
- Front pre-load – 2
- Oil Quantity – 3
- Front Spring Hardness – 4
- Front Swingarm compression – 3
- Front Swingarm extension – 3
-
- Rear Single Shock Absorber:
-
- Rear Pre-load – 4
- Swingarm connector – 3
- Rear spring hardness – 2
- Single shock absorber compression – 3
- Single shock absorber extension – 3
-
- Vehicle Geometry:
-
- Steering head inclination – 4
- Trail – 4
- Steering plate position – 3
- Rear swingarm length – 5
-
- Transmission:
-
- Gears (1-6) – 5-4-4-4-4-3
- Final ratio –4
- Slipper clutch – 7
-
- Brakes:
-
- Front disc – 355 mm
- Rear disc – 220mm
-
- ECU
-
- Traction control – 5
- Engine braking – 4
- Anti-wheelie – 3
- Power mapping – 2
-
This if anything felt a little bit easier to use than the first setup. But my lap times were usually 3-5 tenths per lap off what I could do with the above setup.
Setups and bike handling are subjective though, so test it out versus the first setup and game default to see what works for you.
Moto2 and Moto3 Bike Setups For Catalunya
The MotoGP class bikes are not too hard to control around here once you get used to the layout, and the less powerful Moto2 and Moto3 class bikes are even easier. In fact, riding Catalunya on these bikes is a great way to get used to the game handling and build up confidence.
If you’re looking for custom setups for these bikes as well, check out our MotoGP 23 generic setups page, which has generic starter setups for Moto2/Moto3 as well. Bolt these setups on and test them against the game default to see if you can find more consistency or lap time.
Tips For Riding Around Catalunya
Catalunya is in relative terms one of the easier tracks to learn on these MotoGP games. However, you still need to get your braking points nailed to succeed round here, since there’s gravel run offs and raised kerbs that can catch you out.
Here’s some extra tips for riding around this track.
Braking points – I’d recommend erring on the side of braking a little too early rather than too late, since you’ve got so many sharp corners to make on this track that you need the bike slowed right down to get it leaned in enough to hit the apexes. Brake hard in a straight line with the front brake (take several dabs instead of holding it on), and then release, start leaning and use the rear brake if needed to lean the bike more into corners.
Turn 1 – On MotoGP bikes, your braking point is just before you reach the red and white kerbing on your left. Brake hard with the front brake several times, and then release, turn in and use the rear brake on it’s own if needed to tuck the bike into the apex.
Turn 3 – This is the long sweeping right hander, and there’s not really an elegant way to take this on a MotoGP bike. You might need several stabs on the throttle and leaning to make it round this prolonged corner. Then once you can finally go fully upright, you’re almost immediately having to coast and brake for turn 4.
Turn 5 – Again need to start braking for this sharp left hander almost immediately after exiting turn 4, but only apply the front brake when the bike is fully upright. This game really doesn’t like it if you apply the front brake when the bike is leaning.
Turn 7 – Another one that’s tricky to get the braking right for. About 1.5-2 seconds after exiting turn 5, lift and firmly apply the front brake, then use the rear brake on it’s own to tuck into this tricky turn 7/8 section. Avoid both the inside and outside kerbs though, as they’ll spit you off the bike.
Turn 9 – Once you reach the Tissot overhead sign, dab the front brake very briefly, and lean into the tricky uphill right hander. You can also dab the rear brake if needed to get turned in more. Avoid the inside kerb as it’s another lethal one that will cause you to crash if you ride over it.
Turn 10 – The “Caixa” corner is another very sharp hairpin so start braking quite early on the short back straight to get slowed down enough to make it.
Turns 13/14 – Last two right handers. Just need a very slight dab on the power coming out of turn 12, and then also another dab out of 13 before lifting and leaning into 14. Can use the rear brake to help if needed but if you get your leaning right you can do these two corners without using the brakes.
Tyre temps – The front tyre takes a bit of a battering with all the prolonged, successive right handers. You might see it glowing orange on your HUD, so you might need to fit a hard front tyre for races to stop it overheating so much.
