
The Circuit of the Americas in Austin, Texas is one of the longest and trickiest tracks to get right on the MotoGP games, with lots of corners you need you need to get right to string together just one good lap. To do it repeatedly over an entire race is even more challenging.
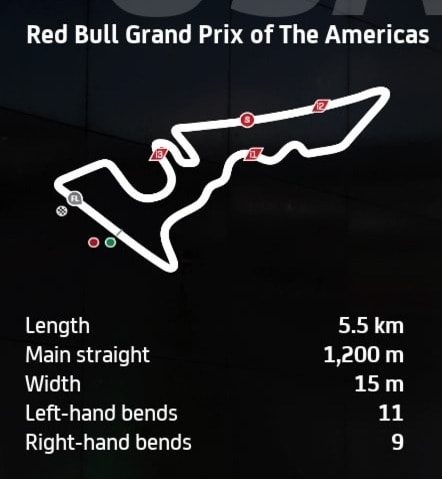
You’ve got everything round here – medium speed corners, super slow and sharp hairpins, plus a technical “esses” section that’s really tricky to nail on MotoGP bikes.
Therefore, you’ve got to be comfortable with any setup you round here to lap consistently, and I always prioritise ease of handing over outright speed with any setup I use on this track.
I tested a few setups and one came out as clear winner for me.
Here is a bike setup for the MotoGP class for Austin, Texas:
- Suspension (Front Fork):
-
-
- Front pre-load – 4
- Oil Quantity – 1
- Front Spring Hardness – 2
- Front Swingarm compression – 4
- Front Swingarm extension – 3
-
- Rear Single Shock Absorber:
-
- Rear Pre-load – 2
- Swingarm connector – 4
- Rear spring hardness – 3
- Single shock absorber compression – 4
- Single shock absorber extension – 3
-
- Vehicle Geometry:
-
- Steering head inclination – 2
- Trail – 5
- Steering plate position – 4
- Rear swingarm length – 4
-
- Transmission:
-
- Gears (1-6) – 5-5-4-4-4-3
- Final ratio – 4
- Slipper clutch – 7
-
- Brakes:
-
- Front disc – 340 mm High Mass
- Rear disc – 220mm
-
- ECU
-
- Traction control – 5
- Engine braking – 4
- Anti-wheelie – 5
- Power mapping – 2
-
The front brake disc is one really crucial parameter. All things being equal, you usually want more stopping power on these bikes, especially at a track like Austin with some heavy braking zones and sharp corners. But I found using the thickest 355 mm disc made lock-ups and “stoppies” too common, especially braking on the massive back straight. Therefore I use the 340 mm High Mass disc, which delivers less stopping power but makes the braking easier.
You also might want to use a lower TC setting like 1 or 2. But otherwise, this is a decent setup that’s not too hard to control once you learn the layout.
Alternative MotoGP Bike Setup For Austin
I did also test a modded version of my template setup I start with on most tracks, just with some settings tailored for this track.
Here it is:
- Suspension (Front Fork):
-
-
- Front pre-load – 2
- Oil Quantity – 3
- Front Spring Hardness – 4
- Front Swingarm compression – 3
- Front Swingarm extension – 3
-
- Rear Single Shock Absorber:
-
- Rear Pre-load – 4
- Swingarm connector – 3
- Rear spring hardness – 2
- Single shock absorber compression – 3
- Single shock absorber extension – 3
-
- Vehicle Geometry:
-
- Steering head inclination – 4
- Trail – 4
- Steering plate position – 3
- Rear swingarm length – 5
-
- Transmission:
-
- Gears (1-6) – 5-5-4-4-4-3
- Final ratio – 4
- Slipper clutch – 7
-
- Brakes:
-
- Front disc – 340 mm High Mass
- Rear disc – 220mm
-
- ECU
-
- Traction control – 5
- Engine braking – 4
- Anti-wheelie – 5
- Power mapping – 2
-
This setup again felt OK around Austin once I got used to the corners, but it felt a little bit easier to be consistent using the first setup. Test it out though and see what you think as different players prefer different setups.
Moto2 and Moto3 Setups For Austin
The slower Moto2 and Moto3 bikes offer a little more leeway round a circuit like this as you’ve more time to prepare for braking zones. But expect super long lap times round here on these less powerful bikes – like 2:10 – 2:20 laps or even longer as you’ve so many long cornering sections to navigate.
For setups for these bikes, check out the generic setups page I made for MotoGP 23, where you’ve got starter setups you can try to find improvements versus the default game setup.
Tips For Riding Around The Circuit Of The Americas
The CoTA circuit takes quite some practice for most players even to put in one clean, non invalidated lap at first. To get consistent enough to put together an entire race without crashing takes even more practice. Here some extra tips for leaning this track.
Braking technique – Because there’s so many corners round this track, that’s more chances to crash if you brake incorrectly, most commonly applying the front brake while leaning or going downhill. Be very careful not to do this as it almost always guarantees that you’ll crash. Only apply the front brake when fully upright. Also always err on the side of braking too early that too late after the longer straights, as it’s very easy to over-run corners since they’re so sharp in many cases and require you to slow the bike right down to take them.
Turn 1 – Braking point is as you reach or pass the overhead sign. Even though it’s uphill, you still need to brake early as it’s quite a sharp corner and you need to scrub off a lot of speed to make it. Use the front brake in a straight line, then add some rear brake if needed to tuck the bike in.
Turn 2 – Don’t apply ANY front brake here as it’s lethal on this game in downhill sections. Just lift off the throttle and lean in to this corner, dabbing the rear brake lightly if needed, but that’s all.
Turns 3-9 (“Esses” section) – This runs in a sequence as follows – left-right-left-double apex right—left–right–left. Brake lightly for the first apex, then lean straight over for the second one without using any brakes or throttle. Then you just need the slightest dab to push through to the third apex. Then the rest of them are just kind of awkward sections on a bike, where you just need to keep coasting, dabbing on the throttle and leaning, using dabs of rear brake if needed to stay on the racing line. But avoid using the front brake at all in this section.
Turn 12 -The sharp left hander at the end of the long back straight. Braking point again is super early – just as you reach or pass the Red Bull overhead sign. Take several dabs on the front brake, and then add some rear brake as well to tuck the bike into the sharp apex. Easy to over-run this corner so be cautious on the braking.
Turn 17-18 – The double apex prolonged right hander before the final two corners. Again an awkward section to take on a bike, as you just need to keep dabbing on the power and then releasing and coasting round the corner. Can’t be taken flat out.
Mastering CoTA – Track Guide
