
The classic Donington Park circuit in the UK was used for real life MotoGP races until 2009, and it’s remained on the last few MotoGP games as an extra historical track. I personally love the circuit and wish it was still the official track for the British GP, as I think it’s got a better flow to it on motorbikes than the Silverstone circuit.
For a bike setup, you need something that’s stable, easy to control and consistent under braking for sure. This circuit is very undulating and uneven, with tricky braking zones combined with elevation changes that can take some practice to get used to.
Here’s the first setup I tried for MotoGP bikes for Donington:
- Suspension (Front Fork):
-
- Front pre-load – 2
- Oil Quantity – 3
- Front Spring Hardness – 4
- Front Swingarm compression – 3
- Front Swingarm extension – 3
-
- Rear Single Shock Absorber:
-
- Rear Pre-load – 4
- Swingarm connector – 3
- Rear spring hardness – 2
- Single shock absorber compression – 3
- Single shock absorber extension – 3
-
- Vehicle Geometry:
-
- Steering head inclination – 4
- Trail – 4
- Steering plate position – 3
- Rear swingarm length – 5
-
- Transmission:
-
- Gears (1-6) – 5-5-4-4-4-3
- Final ratio – 5
- Slipper clutch – 7
-
- Brakes:
-
- Front disc – 340 mm High Mass
- Rear disc – 220mm
-
- ECU
-
- Traction control – 5
- Engine braking – 4
- Anti-wheelie – 5
- Power mapping – 2
-
This setup worked quite well once I got used to the circuit, but the braking is always tricky round here. For that reason, I used the slightly smaller 340 mm High Mass front brake disc, which delivers less stopping power but is at least easier to control in the bumpy braking zones. If you can get away with using the 355 mm disc, then this will deliver stronger braking power, but make crashes more likely at some of the trickier corners.
Alternate MotoGP Bike Setup For Donington
I also tested another setup around here:
- Suspension (Front Fork):
-
- Front pre-load – 4
- Oil Quantity – 1
- Front Spring Hardness – 2
- Front Swingarm compression – 4
- Front Swingarm extension – 5
-
- Rear Single Shock Absorber:
-
- Rear Pre-load – 2
- Swingarm connector – 4
- Rear spring hardness – 3
- Single shock absorber compression – 4
- Single shock absorber extension – 6
-
- Vehicle Geometry:
-
- Steering head inclination – 2
- Trail – 4
- Steering plate position – 4
- Rear swingarm length – 3
-
- Transmission:
-
- Gears (1-6) – 5-5-4-4-4-3
- Final ratio – 4
- Slipper clutch – 7
-
- Brakes:
-
- Front disc – 340 mm High Mass
- Rear disc – 220mm
-
- ECU
-
- Traction control – 5
- Engine braking – 4
- Anti-wheelie – 5
- Power mapping – 2
-
To be honest, for me at least there wasn’t a lot of difference between the two setups. I was going back and forth setting very similar lap times. I have a feeling my first setup might have been very slightly more consistent and easier to control, but there really isn’t much in it. Test each setup to see which you prefer.
Moto2 and Moto3 Setups For Donington
For setups for the slower Moto2/Moto3 class bikes, we’ve got a generic setups page for MotoGP 23, with starter setups for these bikes as well that you can bolt on and test against the game’s default setup to find improvements.
Tips For Riding Around Donington
This track is quite bumpy in some of the braking zones, which can make it a tricky circuit to master. Here’s some extra tips for riding around here.
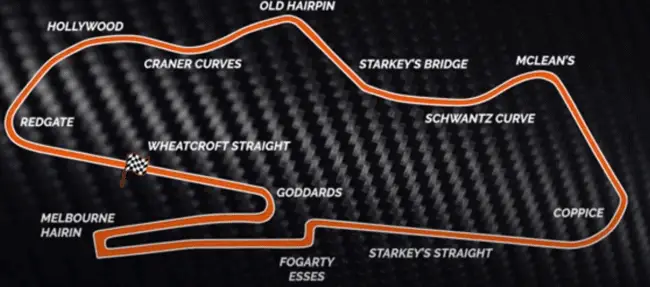
Turn 1 – Redgate corner is an easy looking right hander on the track map, but the bumpiness still makes it tricky. You can brake a bit later than the racing line tells you, but it’s quite a long corner and you have to be patient before getting back on the power.
Braking technique – For the high speed corners in the first half of the circuit especially (turns 2-8), it’s all about the following:
- Gently and briefly applying the front brake if needed, but only when upright and in a straight line
- Leaning in and adding dabs of rear brake if needed to tuck the bike into corners.
- Keeping up as much minimum speed as possible through the corners, scrubbing just enough speed to make the shallower corners, but not too much.
Turn 11 – Second to last corner (sharp right hairpin). Very tricky to get this right, and very easy to over-run. Always err on the side of braking too early – just as the track veers slightly left – and even lift and coast into the braking zones to be safe. Take several dabs on the front brake, and then add some rear brake if needed to get the bike into the apex.
Turn 12 – Just a very short burst on the throttle out of 11, and you need to brake for the last corner. Another very sharp hairpin and very bumpy in the braking zones, so brake early and release the front brake quickly to avoid locking and skidding.
Racing Around Donington Park
