
The Estoril circuit hosted the real life Portuguese MotoGP race until 2012. And it feature on MotoGP 23 and other recent games as a historical track.
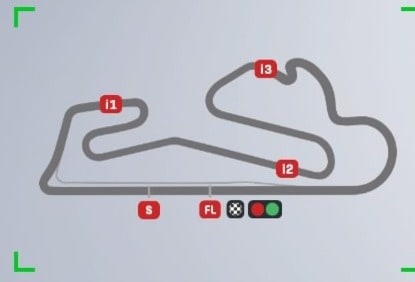
With a very twisty layout, you need a setup that’s stable under prolonged cornering as well as a very restrained mindset to avoid overrunning the corners.
I tested two different setups and one seemed easier to control once I got used to the circuit, while the other seemed a bit faster but harder to control. I’ll cover the easier one first.
Here’s a MotoGP class bike setup for Estoril for MotoGP 23:
- Suspension (Front Fork):
-
- Front pre-load – 2
- Oil Quantity – 3
- Front Spring Hardness – 4
- Front Swingarm compression – 3
- Front Swingarm extension – 3
-
- Rear Single Shock Absorber:
-
- Rear Pre-load – 4
- Swingarm connector – 3
- Rear spring hardness – 2
- Single shock absorber compression – 3
- Single shock absorber extension – 3
-
- Vehicle Geometry:
-
- Steering head inclination – 4
- Trail – 4
- Steering plate position – 3
- Rear swingarm length – 5
-
- Transmission:
-
- Gears (1-6) – 5-5-4-4-4-3
- Final ratio – 4
- Slipper clutch – 7
-
- Brakes:
-
- Front disc – 355 mm
- Rear disc – 220mm
-
- ECU
-
- Traction control – 5
- Engine braking – 4
- Anti-wheelie – 5
- Power mapping – 2
-
This one felt the easiest to be consistent with, but it took some serious practice until I got used to this circuit as it’s quite tight and twisty and hard to get right on a MotoGP bike.
Alternate MotoGP Class Setup For Estoril
Here’s the other setup I tried with different settings parameters:
- Suspension (Front Fork):
-
- Front pre-load – 4
- Oil Quantity – 1
- Front Spring Hardness – 2
- Front Swingarm compression – 4
- Front Swingarm extension – 5
-
- Rear Single Shock Absorber:
-
- Rear Pre-load – 2
- Swingarm connector – 4
- Rear spring hardness – 3
- Single shock absorber compression – 4
- Single shock absorber extension – 6
-
- Vehicle Geometry:
-
- Steering head inclination – 1
- Trail – 3
- Steering plate position – 3
- Rear swingarm length – 5
-
- Transmission:
-
- Gears (1-6) – 4-4-4-4-3-3
- Final ratio – 5
- Slipper clutch – 6
-
- Brakes:
-
- Front disc – 355 mm
- Rear disc – 220mm
-
- ECU
-
- Traction control – 5
- Engine braking – 4
- Anti-wheelie – 5
- Power mapping – 2
-
I felt I could set potentially faster lap times with this setup, but I couldn’t be as consistent with it. But it might be the other way around for you, so test out both setups to see which you prefer.
Moto2 and Moto3 Setups For Estoril
A twisty circuit like this is MUCH easier on the slower Moto2 and Moto3 bikes. You’ve got much more time to prepare for the braking zones and the successive cornering sequences, so even with a default setup for these bikes, you’ll probably find the circuit a lot easier than on MotoGP bikes.
If you want a custom setup, check out my starter bike configuracions page, which has generic setups you can bolt onto Moto2/Moto3 bikes to find improvements in lap time or consistency.
Tips For Riding Around Estoril
Estoril is a tricky circuit to navigate on a bike because it’s quite narrow and tight, and has plenty of gravel run off areas that will punish you if you over-shoot corners.
You need to have some good reference points to be consistent around here. Here’s some tips for different parts of the track.
Turns 1-3 – The first 3 corners are all right handers. You need to brake hard for the first one – reference point is between the two overhead “bwin” signs. Move as far as possible to the left hand side as well for the widest entry angle. This corner also tightens up on the apex, so you need to really get the bike slowed down. Turn 2 is a straightforward 90 degree left, but always brake early for this one as there’s gravel traps right on the outside that’ll catch you out if you over-shoot. Turn 3 is a looping uphill hairpin, but you can use the camber of the track to carry a bit more speed into this one.
Turn 4-6 – As soon as you exit turn 3, you’ve a very short blast on the power before braking heavily for the looping double apex left hairpin of turn 4. I find that taking a narrow line on the inside of the track gains me more time here. Then it’s a very short blast before you lift and lean for the “kink” of turn 5. Then you need to brake early for turn 6 as it’s very easy to over-run this. Use the small brown hut on your right as a reference point.
Turns 8-10 – This is a really awkward slow speed section that’s hard to get right on a bike. Once you exit the right hander of turn 7, what follows is a right-left-right section, with the left-right bit being super sharp and slow corners. So you need to get the bike slowed right down and do a slow in, fast out approach to nail this and get the bike leaned in as it’s a super tight section. You can ride the kerbs for better lap time but only a little bit.
