
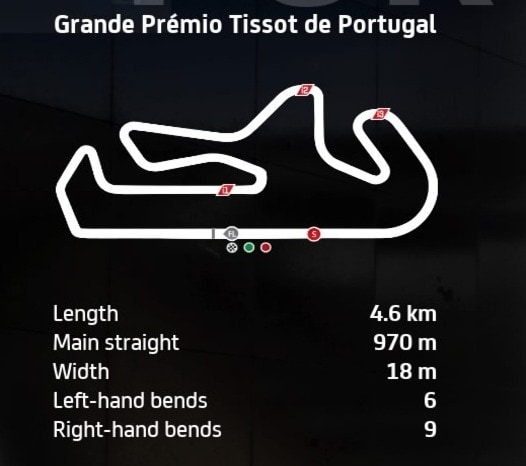
The Algarve circuit in Portimão is one of the very hardest tracks to get right on the MotoGP games, with undulations, blind apexes and very challenging corners in general. It’s also a low grip track which makes everything even harder.
For a bike setup, you need something that’s stable under braking for sure, and then get a lot of practice. It can take 15-20 laps or more on this track to start getting used to the trickier corners and set consistent laps.
Here’s a MotoGP class bike setup for Portimão on MotoGP 23:
- Suspension (Front Fork):
-
- Front pre-load – 2
- Oil Quantity – 3
- Front Spring Hardness – 4
- Front Swingarm compression – 3
- Front Swingarm extension – 3
-
- Rear Single Shock Absorber:
-
- Rear Pre-load – 4
- Swingarm connector – 3
- Rear spring hardness – 2
- Single shock absorber compression – 3
- Single shock absorber extension – 3
-
- Vehicle Geometry:
-
- Steering head inclination – 4
- Trail – 4
- Steering plate position – 3
- Rear swingarm length – 5
-
- Transmission:
-
- Gears (1-6) – 5-5-4-4-4-3
- Final ratio – 5
- Slipper clutch – 7
-
- Brakes:
-
- Front disc – 340 mm High Mass
- Rear disc – 220mm
-
- ECU
-
- Traction control – 5
- Engine braking – 4
- Anti-wheelie – 5
- Power mapping – 2
-
Recommended race tyres:
- Hard front; medium rear
This is just my template setup that I start with on most tracks, with some of the settings very slightly customized for this circuit. For the brakes, I found using the 355 mm front disc led to too many lock-ups in the heavy braking zones, so I used the 340 High Mass one instead. My TC setting is also a little higher – some players might prefer putting this down to 1 or 2.
But this setup worked quite well once I got used to the layout again, and I was setting consistent laps. On this track, I’d go for a setup that you find most stable and allows you to lap most consistently, not necessarily the outright fastest one for single lap pace.
Alternative GP Class Setup
I did also find and test another bike setup with some different setup parameters. It’s not a million miles away from the first setup above. Here it is:
- Suspension (Front Fork):
-
- Front pre-load – 2
- Oil Quantity – 1
- Front Spring Hardness –4
- Front Swingarm compression – 4
- Front Swingarm extension – 3
-
- Rear Single Shock Absorber:
-
- Rear Pre-load – 4
- Swingarm connector – 4
- Rear spring hardness – 2
- Single shock absorber compression – 4
- Single shock absorber extension – 3
-
- Vehicle Geometry:
-
- Steering head inclination – 2
- Trail – 4
- Steering plate position – 3
- Rear swingarm length – 5
-
- Transmission:
-
- Gears (1-6) – 5-5-4-4-4-3
- Final ratio – 5
- Slipper clutch – 7
-
- Brakes:
-
- Front disc – 340 mm High Mass
- Rear disc – 220mm
-
- ECU
-
- Traction control – 5
- Engine braking – 4
- Anti-wheelie – 5
- Power mapping – 2
-
I kept swapping between the two setups quite a lot when testing them, but in the end I preferred the first setup as feeling slightly easier to control. Compare and contrast the two to see which you prefer.
Moto2 And Moto3 Setups
The Moto2 and Moto3 bikes don’t have such insane power and acceleration as the MotoGP bikes, and are a bit easier to control. But this track is tricky on all bikes, and you need good knowledge of the corner layout to properly map the braking and turn in points.
For custom setups for these bikes, check out our generic setups page for the game where we’ve also got generic Moto2/Moto3 setups you can test against the game default setup to find improvements in consistency or lap time.
Tips For Riding Around Here
This track is a very hard one to get right, and needs a very restrained and cautious mindset to succeed at. You can only really open up the accelerator on the long pit straight and the short back straight. The rest of the track, it’s just short bursts and dabs on the power before you need to be braking again.
Here’s some general tips, plus tips for navigating specific corners.
Braking – Need to have your technique spot on with all the tricky corners combined with elevation changes. Never apply the front brake while leaning – only in a straight line while the bike is upright. For heavy braking zones like Turns 1 and 5, take several dabs on the front brake rather than holding it on to prevent lock ups. The rear brake can be used on it’s own to tuck the bike into sharper corners if needed. There are lots of sharp corners on this track where you really need the bike slowed down, so always err on the side of braking too early than too late.
Kerbs – The Kerbs are lethal on this game – avoid riding over them when the bike is leaning as they’ll more often than not spit you off the bike. Turn 3 and turn 8 (uphill right hander) are two ones that always catch me out in this regard.
Turn 1 – Need to brake super early – about 1 second or so after passing the overhead sign. There’s also a painted white line that runs across the track that’s a good reference point to start turning in for the first corner.
Turn 5 – The sharp left hairpin after the short back straight. Again, need to brake super early for this one – I use a white Tissot sign on my right about halfway along the straight as a reference point. You need to get the bike slowed right down as it’s an almost 180 degree hairpin.
Turn 8 – Tricky uphill right hander. Avoid the inside kerb at all costs – stay on the main track surface. Also, on the downhill exit coming out of 8, the front end of the bike wants to come up. Setting a high Anti-Wheelie (AW) setting and being careful on the throttle can help with this.
Turn 10/11 – One of the trickiest corners on the entire calendar, as it’s a blind double apex right hand corner. I like to stick to the middle of the track and ignore the racing line when approaching this corner, as it pulls you too close to the kerbs. Brake gently and briefly in a straight line when going up the hill, then coast and lean in as soon as you see the first apex, ready to hit the second apex. Very easy to run wide on this turn and it just takes practice to get right, not carrying in too much speed.
Turn 15 – Last corner. You can approach this in two ways – sticking close to the inside kerb and the racing line, or running a bit wider and trying to get on the power earlier in a straight line. I can’t really find any difference between the two approaches in terms of lap time so it’s down to personal preference.
Mastering Portimão – Track Guide
