
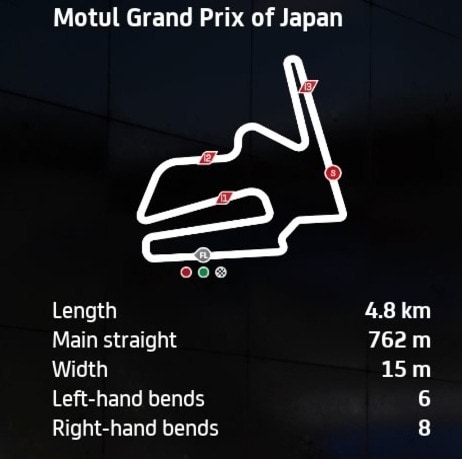
The Motegi circuit in Japan has been on the MotoGP calendar for years, and is a deceptively tricky track. The layout is very simple to learn, but there’s some difficult braking zones and it takes some practice to get this circuit nailed.
This was a tricky one for me to get right on MotoGP 22, and it’s no walk in the park on ’23 either. But with slightly easier braking physics this year, it’s more possible to find a rhythm and lap consistently with a good setup.
And I did find such a setup – it’s not blisteringly fast, but with some practice I was able to lap pretty consistently with it.
Here is a bike setup for the MotoGP class for Motegi:
- Suspension (Front Fork):
-
- Front pre-load – 7
- Oil Quantity – 1
- Front Spring Hardness – 6
- Front Swingarm compression – 1
- Front Swingarm extension – 6
-
- Rear Single Shock Absorber:
-
- Rear Pre-load – 6
- Swingarm connector – 2
- Rear spring hardness – 4
- Single shock absorber compression – 5
- Single shock absorber extension – 5
-
- Vehicle Geometry:
-
- Steering head inclination – 4
- Trail – 5
- Steering plate position – 4
- Rear swingarm length – 6
-
- Transmission:
-
- Gears (1-6) – 5-5-4-4-4-4
- Final ratio – 4
- Slipper clutch – 7
-
- Brakes:
-
- Front disc – 355 mm
- Rear disc – 220 mm
-
- ECU
-
- Traction control – 5
- Engine braking – 4
- Anti-wheelie – 4
- Power mapping – 2
-
With the largest front brake disc, maximum slipper clutch and high engine braking value, this setup is configured for strong stopping power, which is what you need the most around Motegi to avoid over-running corners and falling off.
I did also try a slightly modded version of my generic MotoGP class setup, with a 355mm front brake disc, 5-5-4-4-4-4 gears and 5443 ECU settings. But honestly, it didn’t feel very good at all round Motegi – I wasn’t very fast and also not consistent using it. So despite it working very well on most tracks on ’23, specifically at Motegi it’s a no go and the only setup I have to recommend is the one above.
Moto2 And Moto3 Class Setups For Motegi
For the slower and less powerful Moto2 and Moto3 bikes, check out our MotoGP 23 generic setups page for starter setups for these bike classes as well. The slower speeds and easier braking physics make these bikes a bit easier to control, so bolt on these setups and test versus a default to see if you can find a bit more time.
Again though, be careful with your braking zones (and especially the hairpins) around Motegi even on the Moto2/Moto3 bikes. Although acceleration and top speed are slower with these, and you’ve more time to react and see what’s coming, braking power is also a bit less, so you can still over-run if you’re pushing too hard for lap time.
Tips For Riding Around Motegi
To be able to ride consistently around Motegi, in my opinion it’s all about the brakes – your brake settings and braking technique. If you over-run corners here, there’s a lot of gravel traps on the run-offs so you’ll most likely be crashing. It’s about being steady and consistent and finding good rhythm. Here’s some tips to putting together consistent laps around here.
Braking technique – I find that going into heavy zones with a strong but brief initial burst of the front brake, then letting off, turning in and using additional dabs of rear brake to get the bike leaned in more if needed, is the best approach around here.
Braking points – I would always err on the side of braking too early than too late at Motegi. Almost all the hairpins have gravel traps on the outside that’ll punish you if you over-shoot. Focus more on getting into a rhythm rather than pushing to gain time on the sharp corners. I sometimes also lift and coast into braking zones to make sure I’m not over-running, as I’d rather just be consistent round here than always pushing for lap time.
Brake discs – On MotoGP 23 so far I’ve mostly been using just 340 High Mass front brake discs to carry more speed and make the braking less tricky. But on this track, I need that stopping power to get turned into the hairpins. Use the Max 355 mm (13 in) front disc if you can – it made me a lot more consistent and able to hit the apexes more accurately.
Turn 1 – Brake as soon as you hit the start-finish line and the overhead “Motul” sign. Use a strong burst of front brake, then some additional rear brake if needed as it’s a prolonged hairpin. Then it’s just short burst for the next straight onto a similar left hairpin, then back up again to a right hairpin.
Back straight – The braking zone at the end of this straight is tricky as it’s downhill. Brake earlier than you might think – just after you hit 6th gear on MotoGP bikes. Use a strong initial dab of front brake, then lift off and use the rear brake to tuck the bike into the corner if needed.
Last chicane – This is another tricky left—left-right section to finish the lap, and it’s very easy to crash the bike under braking as you’ve got a quick change of direction. I lean into the first left coasting off the accelerator, then brake slightly to get slowed down for the final left-right chicane. Then it’s a case of leaning over to clip the inside kerb and then quickly swapping over to the right to finish the lap. Don’t use the front brake when changing direction for this last chicane; a very slight dab of the rear brake can turn the bike in if needed, but not more than that.
