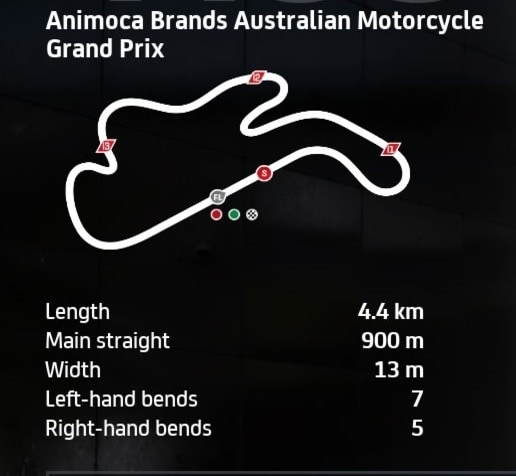
The Phillip Island track has been on the MotoGP calendar for years, but is a very tricky circuit to get right. Not one for beginners for sure. It’s hard just to put one or two solid laps in round there, never mind complete a full race.

The track is quite narrow and has a few very tricky braking zones, so you need a setup you feel comfortable with, plus lots of practice to get this circuit right.
I tested a few different bike setups, but I only really found one that worked OK for me and made the track a bit easier.
Here’s a MotoGP class bike setup for Phillip Island for MotoGP 23:
- Suspension (Front Fork):
-
- Front pre-load – 7
- Oil Quantity – 1
- Front Spring Hardness – 6
- Front Swingarm compression – 1
- Front Swingarm extension – 6
-
- Rear Single Shock Absorber:
-
- Rear Pre-load – 6
- Swingarm connector – 2
- Rear spring hardness – 4
- Single shock absorber compression – 5
- Single shock absorber extension – 5
-
- Vehicle Geometry:
-
- Steering head inclination – 3
- Trail – 4
- Steering plate position – 3
- Rear swingarm length – 4
-
- Transmission:
-
- Gears (1-6) – 5-5-4-4-4-4
- Final ratio – 4
- Slipper clutch – 7
-
- Brakes:
-
- Front disc – 340 mm High Mass
- Rear disc – 220mm
-
- ECU
-
- Traction control – 5
- Engine braking – 4
- Anti-wheelie – 4
- Power mapping – 2
-
Although I don’t think there’s really any setup that can make this track easy, I found this one did at least make it a bit easier to lap semi-consistently once I got used to the layout.
The braking is the crucial thing here. I usually like using the max 355 mm front brake disc, but it makes the already tricky braking even harder at this track, so I went one step lower to the 340 mm High Mass disc instead.
And that’s really it for usable bike setups for Phillip Island. I did also test a modded version of my template setup for MotoGP 23, with the gears, brakes, and ECU settings ported over from the above setup, but it didn’t work very well for me.
Moto2 & Moto3 Setups For Phillip Island
The less powerful Moto2 and Moto3 class bikes are slightly more forgiving around Phillip Island. You’ve slightly more time to react to what’s coming, but really this track isn’t easy on any bike class because of the awkward corners and braking zones.
Nevertheless, if you want custom setups for these bike classes, check out my generic setups page for MotoGP 23, which also has starter setups for Moto2/Moto3 bikes. You can test these against the game default to find improvements, but really I think this track is about practice and careful braking technique more than anything else.
Tip For Riding Around Phillip Island
Despite having a track layout that looks like it’s easy, I think Phillip Island is one of the hardest circuits of all to lap consistently on the MotoGP games. With the track so narrow, the grass run offs ready to punish you, and the tricky downhill braking zones, it’s very easy to fall of the bike here.
Here’s some extra tips for riding around here.
Braking technique – There’s a couple of corners on this track that can really catch you out if you get your braking even slightly wrong. Do not apply any front brake while the bike is leaning on MotoGP 23. It almost always causes you to crash. Only use the front brake when the bike is upright and in a straight line. Applying the front brake into downhill corners also causes crashes on this game.
Turn 1 – The braking point for this is just after you pass the painted white line that runs across the track. Brake hard in a straight line about 0.5 seconds after you pass this line. You can carry quite a bit of speed into this corner.
Turn 3/4 – Turn 3 is the left hand kink after you exit the long hairpin of 2. Once the kerbing on your right ends, that’s when you need to lift off the power and lean in. It’s best not to apply any brakes here and just coast through this corner off throttle. Then, exiting this short left hander, don’t apply any throttle at all and instead start braking immediately for the turn 4 right hand hairpin. It’s super easy to over-run this corner, so be careful not to carry in too much speed. Coast out of turn 3 and brake right away for T4.
Turn 10 – This is another super tricky sharp right hand corner with a downhill entrance. Only dab the front brake lightly when fully upright at the top of the hill that runs onto this corner, and then apply some rear brake on it’s own if needed to tuck the bike into this corner. It’s easy to crash on this corner if you apply any front brake when the bike is even slightly leaning.
Turn 12 – The last corner. Braking point is just after you pass the painted white line the runs across the track. Stick close to the inside kerb and ease on the throttle gradually on the exit to get a good run onto the pit straight, without running too wide as is common on this game.

