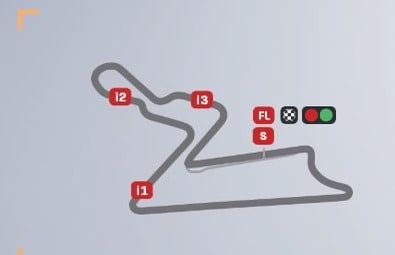
The Buddh International Circuit is probably best known for being on the Formula 1 calendar from 2011-2013. But from 2023 onwards, it’s also now on the MotoGP calendar and MotoGP game with a slightly revised layout.

It’s great that this circuit has made a return to sim racing, but I’ll start off by saying this is a VERY tricky track to get right on a MotoGP bike, with lots of sharp corners and tricky braking zones combined with elevation change.
You need a setup you can feel comfortable and stable with, but no matter what you’ll need some serious practice to master this circuit.
Here is a bike setup for the MotoGP class for India:
- Suspension (Front Fork):
-
- Front pre-load – 2
- Oil Quantity – 3
- Front Spring Hardness – 4
- Front Swingarm compression – 3
- Front Swingarm extension – 3
-
- Rear Single Shock Absorber:
-
- Rear Pre-load – 4
- Swingarm connector – 3
- Rear spring hardness – 2
- Single shock absorber compression – 3
- Single shock absorber extension – 3
-
- Vehicle Geometry:
-
- Steering head inclination – 4
- Trail – 4
- Steering plate position – 3
- Rear swingarm length – 5
-
- Transmission:
-
- Gears (1-6) – 3-3-3-3-3-3
- Final ratio – 4
- Slipper clutch – 7
-
- Brakes:
-
- Front disc – 355 mm
- Rear disc – 220 mm
-
- ECU
-
- Traction control – 5
- Engine braking – 4
- Anti-wheelie – 5
- Power mapping – 2
-
Recommended race tyres:
- Hard front; Medium rear
-
This is a very close mod of the my generic/template MotoGP 23 setup, and worked the best for me, especially the second time I really played on this track having got used more to the handling.
More advanced players might want to use something like 1542 or 2542 for their ECU settings. I just have a high TC value to get rid of the annoying understeer you’ll find on default setups on MotoGP 23.
Alternate MotoGP Bike Setup For Buddh
I did try another setup that also worked well and allowed me to lap consistently, but wasn’t quite as fast for me at least as the above setup. It’s basically a very close mod of the default game MotoGP bike setup.
Here it is:
- Suspension (Front Fork):
-
- Front pre-load – 3
- Oil Quantity – 3
- Front Spring Hardness – 3
- Front Swingarm compression – 3
- Front Swingarm extension – 3
-
- Rear Single Shock Absorber:
-
- Rear Pre-load – 3
- Swingarm connector – 3
- Rear spring hardness – 3
- Single shock absorber compression – 3
- Single shock absorber extension – 3
-
- Vehicle Geometry:
-
- Steering head inclination – 4
- Trail – 4
- Steering plate position – 3
- Rear swingarm length – 3
-
- Transmission:
-
- Gears (1-6) – 3-3-3-3-3-3
- Final ratio – 6
- Slipper clutch – 4
-
- Brakes:
-
- Front disc – 355 mm
- Rear disc – 220 mm
-
- ECU
-
- Traction control – 5
- Engine braking – 4
- Anti-wheelie – 5
- Power mapping – 2
-
Test each one out to see what works best for you. At first, it’s probably better to use a setup you can control more consistently rather than the outright fastest one, as this track has some tricky braking zones.
Moto2 and Moto3 Setups For Buddh
For the slower Moto2 and Moto3 class bikes, check out our generic setups page for MotoGP 23 for some generic starter setups you can bolt on for these bikes and test against a default game setup to find improvements.
Tips For Riding Around Buddh
This track is in my opinion one of the toughest on the entire game when you first try it, and it takes a lot of practice to get all the corners nailed. You’ve got that combination of heavy braking zones that are also uphill/downhill leading into sharp corners – the hardest corners to consistently get right on MotoGP bikes.
Therefore, you need to get your braking spot on and be boringly well behaved and restrained on the throttle. Much like the Motegi track I’ve also just done a setup for, lapping consistently here is all about good braking technique and patient consistency. Restraining yourself to stay strictly on the racing line/ideal trajectory is what brings the lap time rather than pushing too much and trying to “force” lap time.
Update – After coming back to this track after spending a few more weeks learning the game handling, I actually found it much easier and really enjoyed it. Get used to the braking physics of the game before really spending some time on this track.
Learning Buddh On MotoGP 23 (video)
Here’s some extra tips for riding the new Buddh circuit on MotoGP 23:
Braking technique – Because of all the tricky braking zones round this track, it’s better to a) get into the habit of getting your braking done in a straight line when totally upright when possible, and b) taking several stabs at the brakes for sharper/heavier braking zones like turn 1/3/4/5, instead of applying the front brake and holding it on. Locks ups are very common round here so you have to be more gentle with the brakes to stay on the bike.
Specific Corners – Here are some pointers for tackling the more tricky corners based on my own practice:
- Turn 1 – Brake hard as you reach the overhead sign, but take a couple of dabs. Is quite a sharp corner so you need to get slowed down. A tiny bit of rear brake on it’s own can help get leaned in, but too much and you’ll fall off.
- Turn 3 – Tricky blind right hand uphill apex. Start lifting/braking as soon as climbing up the short hill. Brake in a straight line and take several dabs rather than one input, and begin leaning about halfway up it. Really challenging corner that just needs practice to get right, but can gain you a lot of time if you nail it perfectly.
- Turn 4 – Another sharp right after the long straight. Start braking hard just after the overhead sign, and again I find several stabs on the front brake works better than one long input.
- Turn 5 – Left hander but as it’s a downhill braking zone, is more tricky than it looks. Again several dabs on the front brake can work better, and a very small dab of rear brake mid corner can also get the bike leaned in as it tightens up on the exit.
- Turns 8/9/10 – Has been reprofiled from the F1 circuit so they now use the inside, tighter version of this prolonged hairpin. As you come out of the turn 7/8 chicane, it’s only the very slightest dab on the power before you need to start lifting and leaning in for 8/9/10 (gravel traps will screw you if you run into this section too hot).
- Turn 13 – Penultimate turn, and a deceptively tricky one. Again get your braking done early on and in a straight line, and just lean/coast round this corner. Applying any brakes round this turn is not recommended as it’s very easy to crash with the amount the bike is leaning.
- Turn 14 – Last corner. Not too bad as long as you brake in a straight line again. Can get away with adding a very brief dab of rear brake on the apex as well to tuck the bike in ready to run onto the pit straight.
Come Back Later – Although it’s tempting to race new tracks on a game right away, with the Buddh circuit it can be good to leave it for a while if you’re finding it too tough and come back to it a few weeks later once you’ve practiced on the other tracks and got used to the handling.

