
The Chang International Circuit in Buriram, Thailand has been on the MotoGP calendar since 2018. And it’s one of the easier tracks to learn, with a simple layout and straightforward corners.
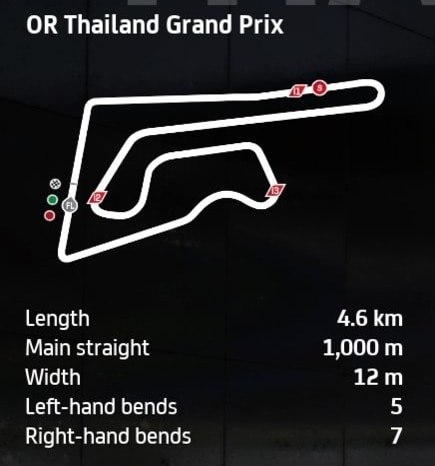
For a bike setup, you need something that’s good on the brakes for sure, as you’ve several heavy braking zones after long straights, plus sharp corners where you need to get the bike slowed right down.
Here’s a MotoGP class bike setup for Chang on MotoGP 23:
- Suspension (Front Fork):
-
- Front pre-load – 2
- Oil Quantity – 3
- Front Spring Hardness – 4
- Front Swingarm compression – 3
- Front Swingarm extension – 3
-
- Rear Single Shock Absorber:
-
- Rear Pre-load – 4
- Swingarm connector – 3
- Rear spring hardness – 2
- Single shock absorber compression – 3
- Single shock absorber extension – 3
-
- Vehicle Geometry:
-
- Steering head inclination – 4
- Trail – 4
- Steering plate position – 3
- Rear swingarm length – 5
-
- Transmission:
-
- Gears (1-6) – 5-4-4-4-3-3
- Final ratio –4
- Slipper clutch – 7
-
- Brakes:
-
- Front disc – 355 mm
- Rear disc – 220mm
-
- ECU
-
- Traction control – 5
- Engine braking – 4
- Anti-wheelie – 3
- Power mapping – 2
-
This is really just my default template setup for MotoGP bikes, but modified for stronger braking power as that’s what you really need round here.
It didn’t take me long to get into a rhythm and lapping the track pretty consistently using this setup, so I’d recommend it as a good starting point for sure.
Alternative MotoGP Class Bike Setup For Chang
I did also test another setup that was also decent, but not quite as good as the first one:
- Suspension (Front Fork):
-
- Front pre-load – 7
- Oil Quantity – 1
- Front Spring Hardness – 6
- Front Swingarm compression – 2
- Front Swingarm extension – 6
-
- Rear Single Shock Absorber:
-
- Rear Pre-load – 6
- Swingarm connector – 2
- Rear spring hardness – 4
- Single shock absorber compression – 5
- Single shock absorber extension – 5
-
- Vehicle Geometry:
-
- Steering head inclination – 3
- Trail – 4
- Steering plate position – 3
- Rear swingarm length – 6
-
- Transmission:
-
- Gears (1-6) – 5-4-4-4-3-3
- Final ratio – 4
- Slipper clutch – 7
-
- Brakes:
-
- Front disc – 355 mm
- Rear disc – 220mm
-
- ECU
-
- Traction control – 5
- Engine braking – 4
- Anti-wheelie – 3
- Power mapping – 2
-
I could set roughly similar lap times using this setup as the top one, but it didn’t feel quite as easy to lap consistently using it. Setups and bike handling are very subjective though, so test this one against the game default and the first setup to see what you prefer.
Moto2 and Moto3 Bike Setups For Chang
For the less powerful and easier to control Moto2 and Moto3 class bikes, check out our generic setups page for MotoGP 23, which also has starter setups for Moto2 and Moto3 bikes that you can test against the game default to find more pace or consistency.
Chang is one of the easier circuits and with the less powerful bike classes, you get even more time to see what’s coming and respond to corners and mistakes, so it’s a good track to practice and build confidence up on the game.
Tips For Riding Around Chang
The Chang Circuit is one of the easier ones to get into a rhythm and lap consistently round. But here’s a few extra tips for navigating certain corners on this track.
Turn 1 – Start braking as you approach the overhead sign. Brake briefly but firmly with the front brake, and then release and use the rear brake on it’s own the tuck the bike into the apex if needed. You can carry a bit more speed into this corner this year as it feels like the track widens on the exit.
Turn 3 – This is the sharp hairpin after the massive straight. Start to brake as soon as the track kinks very slightly left. Take several stabs on the front brake, and then release and use the rear brake as well if needed to get the bike leaned into this sharp corner. If you’re over-running this corner, either brake earlier, use a larger front brake disc or increase the engine braking setting.
Turn 4 – The fast left hander after the back straight. Braking point is just before you reach the overhead Tissot sign. Firmly apply the front brake once, but you can carry some speed into this corner as it’s not particularly sharp. Then it’s just a very brief dab on the power before you need to brake again for turn 5.
Turn 8 – Right hander as you come out of the 5/6/7 complex. Easy to over-run this one. Braking point is before you reach the overhead sign. Need a strong input of the front brake, and also optionally the rear brake to get the bike leaned in easier.
Turn 12 – Last corner, very sharp hairpin. Braking point is as you approach the advertising signs on your left. I also like to coast a little before this and then begin braking, as it’s such a sharp corner that I’d rather be cautious on entry. You need to brake hard to get the bike slowed down enough, and you can also use the rear brake on it’s own to get rotated back onto the pit straight.
