
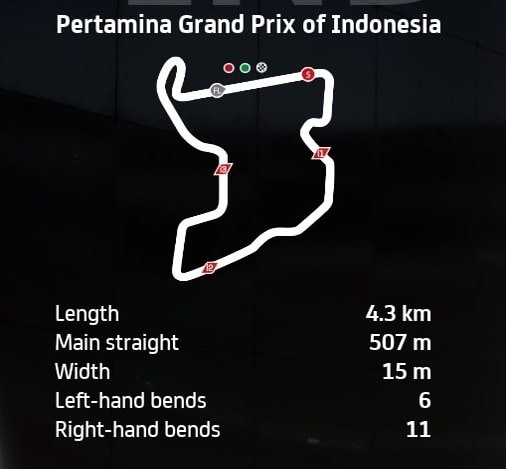
The Mandalika circuit in Indonesia debuted on the MotoGP calendar in 2022, and it’s a great track for beginners to get into these games because it’s got a very easy to learn layout and a wide open track.
For a bike setup, you just really need something that you feel comfortable and can ride consistently, since the corners are pretty straightforward.
I tested a couple for bike setups, but one in particular was hands down the easiest to ride for me. It’s just a modded version of my template setup I always start with on most tracks.
Here’s a MotoGP class bike setup for Mandalika for MotoGP 23:
- Suspension (Front Fork):
-
- Front pre-load – 2
- Oil Quantity – 3
- Front Spring Hardness – 4
- Front Swingarm compression – 3
- Front Swingarm extension – 3
-
- Rear Single Shock Absorber:
-
- Rear Pre-load – 4
- Swingarm connector – 3
- Rear spring hardness – 2
- Single shock absorber compression – 3
- Single shock absorber extension – 3
-
- Vehicle Geometry:
-
- Steering head inclination – 4
- Trail – 4
- Steering plate position – 3
- Rear swingarm length – 5
-
- Transmission:
-
- Gears (1-6) – 5-5-4-4-4-4
- Final ratio – 5
- Slipper clutch – 7
-
- Brakes:
-
- Front disc – 355 mm
- Rear disc – 220mm
-
- ECU
-
- Traction control – 5
- Engine braking – 4
- Anti-wheelie – 4
- Power mapping – 2
-
Recommended tyres: Hard front; Medium rear
This was a good setup to get comfortable riding the track with, with strong stopping force for the couple of heavy braking zones you’ve got round here.
Alternative Mandalika MotoGP Class Bike Setup
I did test another setup, but for me at least it wasn’t as good as the first one. Here it is:
- Suspension (Front Fork):
-
- Front pre-load – 7
- Oil Quantity – 1
- Front Spring Hardness – 6
- Front Swingarm compression – 1
- Front Swingarm extension – 6
-
- Rear Single Shock Absorber:
-
- Rear Pre-load – 6
- Swingarm connector – 2
- Rear spring hardness – 4
- Single shock absorber compression – 5
- Single shock absorber extension – 5
-
- Vehicle Geometry:
-
- Steering head inclination – 3
- Trail – 4
- Steering plate position – 3
- Rear swingarm length – 5
-
- Transmission:
-
- Gears (1-6) – 5-5-4-4-4-4
- Final ratio –5
- Slipper clutch – 7
-
- Brakes:
-
- Front disc – 355 mm
- Rear disc – 220mm
-
- ECU
-
- Traction control – 5
- Engine braking – 4
- Anti-wheelie – 4
- Power mapping – 2
-
I wasn’t anywhere near as consistent using this setup, but bike handling is very subjective so test it out and see what you think.
Moto2 and Moto3 Bike Setups For Mandalika
This track is really one of the easier ones even for the MotoGP bike, and for the slower Moto2 and Moto3 bikes, it’s even easier. With such a wide track and massive tarmac run off areas, plus a simple layout, it’s great for newbies to build up confidence on using the Moto2/Moto3 bikes.
For setups for these, see our generic setups page for MotoGP 23 where we’ve got generic starter setups you can bolt onto Moto2 and Moto3 class bikes to test against the game default and find improvements.
Tips For Riding Around Mandalika
Mandalika isn’t too challenging a circuit, but here’s some extra tips specifically for this track:
Tyre Tempeatures – Fit a hard front tyre to avoid overheating. Using the medium tyre round here, the front tyre was glowing red on my HUD after 1 lap.
Turn 1 – On MotoGP bikes, the braking point is about half a second after you hit 6th gear on the pit straight. Then it’s a very short blast for about half a second again before you need to brake for Turn 2 (you can cut the kerb here a little bit).
Middle section – After you get the first few turns out the way, you’ve got the faster “kinks” that go in this sequence: right-right—-right-left-right. You can carry a lot of speed into these corners and just use the rear brake brake lightly to tuck the bike in, and it’s just short burst or dabs on the power before you need to lift and lean into the next turn.
Turn 10 – Then after you exit the “esses” section it’s just another short burst on the power before you need to brake hard for the sharp right hairpin of turn 10. It’s better to brake earlier rather than later for this corner as it’s easy to over-run.
